Wednesday, November 6, 2013

General Sizing: Hats

As I've mentioned before, I list sizes by age and that can be somewhat arbitrary. I always try to give you the most accurate sizing information possible by also including the actual measurements. However, sometimes when I am given a custom request, the "size" asked for may not correspond to the measurements you and I are both thinking of. To help you figure out what size to be ordering, I put together this list*:

PREEMIES

1-2 lb (1 kg)7.5-8 in circumference
 3.5-4 in height
18-20 cm circumference
10 cm height
2-3 lb (1.4 kg)8.5-10 in circumference
4 in height
22-25 cm circumference
10 cm height
4-5 lb (2 kg)9-11.5 in circumference
4-4.5 in height
23-28 cm circumference
10-11 cm height
5.5-6 lb (2.7 kg)11-12 in circumference
5-5.5 in height
28-30 cm circumference
3-15 cm height

BABIES

Newborn (0-3 months)11.5-13 in circumference
5.5-6 in height
29-33 cm circumference
13-15 cm height
3-6 months12-15 in circumference
6.5-7 in height
30-38 cm circumference
15-18 cm height
6-12 months14-17 in circumference
7.5 in height
36-43 cm circumference
18 cm height
Toddler (1-3 years)16-18 in circumference
8 in height
41-46 cm circumference
20 cm height

KIDS

Toddler (1-3 years)16-18 in circumference
8 in height
41-46 cm circumference
20 cm height
3-10 years17-18.5 in circumference
8.5 in height
43-47 cm circumference
22 cm height
Pre-teens18.5-20 in circumference
9-10 in height
47-60 cm circumference
23-25 cm height

ADULTS

Teens18.5-20 in circumference
9-10 in height
47-60 cm circumference
23-25 cm height
Women19.5-20.5 in circumference
11 in height
50-52 cm circumference
28 cm height
Men21-22 in circumference
11-11.5 in height
53-56 cm circumference
28-30 cm height

This is an approximation, but I try to follow this list as best I can when posting items.You will notice some ranges overlap; this is because head sizes vary, but my listings will usually have a concrete measurement listed. If there is a range in the listing, the fist number is from the piece being laid flat and the second is with some stretch to give you an idea of what size head it can comfortably fit (typically hats can stretch comfortably 2 inches beyond circumference).

I'll give you a quick break-down of how I measure head wear:
  • Circumference is determined by laying the hat out flat, measuring across the widest part, and doubling the result.
  • Height is determined by laying the hat out flat and measuring from the brim (does not include ruffles, earflaps, etc) to the highest point of crown.


*You can order by size or provide the actual measurements of your child's head. If you find measuring your child's head difficult (which is understandable, they can be quite squirmy) or are ordering for someone else's child, you can measure a hat that already fits or use my chart above to estimate what size you want.

Wednesday, October 30, 2013

How do you price hand made items?

This is a common problem for any one trying to get into selling their hand made items. How do you determine a price? What is fair? How do you compete with others making similar things?

You don't really want to charge for your time, because prices could skyrocket. I could get away doing this for some items, if I charge $5/hr and no more. For example, I can do a pair of simple booties in 3-4 hours, so that would be $15 or $20...I charge that for some booties, but the very basic ones I charge less. Would you be willing to pay that much for a solid color pair of booties? Maybe, but only because they are hand made. And if I up my rate to say $7 or even $10 an hour (which is still low-balling the worth of my work by just barely hitting what baby sitters make, and is a good deal less than what I make at my day job being a receptionist/admin), then the prices are getting to $21-$28 or $30-$40 per pair of booties. Now would you be willing to pay that for a simple pair of booties? Probably not. And I reiterate this is a simple pair. The roller skates, for example, take considerably longer as I am making and attaching 8 wheels. If I charged by time, the cost would almost double. Even going back to charging $5/hr, that is $30-$40 per pair of roller skate booties. Seems a bit outlandish, doesn't it? An afghan, which takes me about a week (let's say 15 hours), would cost $75. Maybe for a full/adult sized afghan would you be willing to pay that, but probably not for a baby sized afghan...

So...realizing hourly wage is in no way fair to me or you, I've done a fair bit of research online trying to figure out how to fairly price my products. The simplest and least concrete method is to look at similar items on etsy (or other shops like artfire, etc) and see what other people are charging, then determine where in this range your product falls with you feeling like you can actually make a decent profit. I did this at first when I opened my shop as Caiti Scarlet Designs and carried jewelry. This worked for me, and I found prices that I felt were competitive without cheapening my product, and I was happy with the return. However, if you shop around, have a lot of business, the right connections, or other crafty friends, you can buy in bulk and save a lot there as well so this method isn't likely to hurt you. Not so much with yarn...

I've come across 2 reasonable ways that other yarn crafters have used. Method 1 involves measuring your yardage and charging by the yard. The amount I saw was $0.05 per yard. This is rather fair, although does not fully compensate any embroidery, stuffing, eyes, beads, or other embellishments. But as far as a base goes, I find it fairly reasonable. Also, this was a year or so ago, so the recommended rate per yard may have even jumped. The only problem, other than lack of compensation for other materials, is that you need a way to determine your yardage. This can be done by weighing your yarn (in whatever way makes sense to you...such as the skein before and after, or the finished project, etc). Just use the provided info on your yarn label and do a quick equation of total weight multiplied by yarn over grams. There are also nifty little yardage counters you can use while knitting up your item.

Now I find the need to weigh my yarn or run my yarn through a a counter a bit finicky and annoying. Also, I don't like the fact that it doesn't provide an easy way to accommodate for your other materials. Because of this I use Method 2, which is basically charging 3 times your total material costs for the product. This also provides a fair and reasonable price, and it is a bit easier to figure out than the previous method.

I usually stick to this method...it is simple to follow and gives me pretty even pricing across products. However, when selling online there are fees to consider. If you do not want your fees to cut into your profit, consider adding 10% to the price. That isn't an arbitrary number, and I'll show you how I came up with it, but for those of you looking for the quick answer, there it is.

The Basic Process:
Base Price: 3 x materials cost
Etsy Listing Fee: $0.20
Etsy Selling Fee: 3.5% Base Price
Paypal Fee: 5% Base and Shipping


OR 110% x (3x materials cost)


          An Example: a typical infant afghan (priced at $35)
Materials: 3 skeins yarn @ $3.99 each (excludes tax)
Materials Cost: 3 x $3.99=$11.97

Base Price: 3 x $11.97=$35.91
Etsy Listing Fee: $0.20
Etsy Selling Fee: 3.5% x $35.91=$1.26
Paypal Fee: 5% x ($35.91 + $10.95*)=$2.34

Total Price: $35.91+$0.20+$1.26+$2.34=$39.71

$39.71÷$35.91=1.106 or 110%

*assuming priority mail medium flat rate box

Friday, October 25, 2013

Simple Origami Box

I've been doing origami (the Japanese art of paper folding) since I was about 6. My best friend all through grade school had moved to American from Japan in Kindergarten. We became fast friends and spent a lot of time together. I remember all the time spent at her house, where they all still spoke Japanese, the trips to the Japanese mall (then it was called Yohan, now it is known as Mitsuwa), watching anime and reading manga with Shiho translating everything for me, learning enough Japanese to insult someone (that's what's important when you are under 10!). I also remember Shiho teaching me origami and my fast obsession with it.

Nowadays I don't do it as much as I used to. I find neat ways to use origami for decoration or gift wrapping though. Sometimes if I have a small gift, I'll even make a box (and if you ever ordered from me when my shop was Caiti Scarlet, then you received your purchases in origami gift boxes). If you ever run into me at my day job, you will notice I tend to whip them up for small candies as well...


Because I am lazy and did not want to waste paper testing out different boxes, I turned to Google and found this little gem. Simple, and larger than the "standard" box I usually make (and was avoiding in order to fit all my mints in there). This is a great basic box, and it is so easy beginner's should not have trouble.

If you are interested in the mints, they are home made butter mints. I've been wanting to make them forever and found this recipe online. Just like bread, the humidity will affect your dough and I found myself using closer to 4 cups of powdered sugar. I also do not much care for peppermint, so I picked up some "Pure Mint" extract instead. It's kind of a fresh mint/spearmint mix. I also found myself using much more extract...at least 1 tsp, and probably closer to 1.5. Don't take this to mean you should use this much though, especially if you are using peppermint (I think it is much stronger). It was easy to add more in at the end, so follow Averie's advice

Wednesday, October 23, 2013

Winter Wedding Mittens

Following off of last week's Shop Info post, I am working on an order for someone local who knows me and the kind of projects I get myself into (If you want to know what I am talking about, check out my Sent Swap Packages album on flickr...sometimes I am rather ambitious n_~). This girl is having a winter wedding and saw an adorable wedding picture on Pinterest where the bride and her bridesmaids were out in the snow in their dresses, and all the bridesmaids had on coordinating mittens. So her request is that I make 6 pairs of different mittens in her colors: grey, teal, and white.

I've been spending the past few weeks swatching away, trying to come up with neat ways to pattern the colors for the bride to choose from. Some of these designs actually lend themselves to being repeated, depending on which color is made dominant. I started without a swatch of the dress color, just to get some ideas of how the colors would work up, figuring I can also get more accurate colors for the actual mittens if necessary. 
these are the mock swatches the bride chose,
click the picture to see a .pdf of all the ones I came up with
I also spent some time hunting for generic mitten patterns or formulas. I would just figure it out on my own, they are a rather basic construction, but I have incredibly tiny child hands so am a bit concerned about making them too small. I looked around and found a lot of patterns using similar stitch counts and measurements for an average woman's mitten, so instead of making a striped swatch I made a striped mitten using this information for the bride to try on.
Mitten picture forthcoming...

The bride also wanted buttons like in her inspiration picture, but thought that sparkly snowflakes would be cuter. I have been browsing around and collected a few different ones for her consideration. We may explore other options, but the rhinestone snowflakes seemed to be the best looking sparkly options.
click to enlarge for detail,
but this image best represents actual sizes
(UL: 3/4", LL: 7/8", R: 1")
The wedding is not until winter of 2014, and the bridesmaids won't be picking their dresses until February so I have a bit of time. Luckily Christmas knitting won't interfere at that point, so as soon as dresses are picked and the teal color is finalized I will be speeding my way through these mittens. Expect to see the finished order on my blog and in my shop early next spring. If you are interested in something similar, just contact me*!

* I am very easy to get a hold of...Send a message or post a comment on Facebook/Google+, comment here, use the email button on the side bar, etsy convo me, or use the "Request Custom Item" button in my shop n_n 

Friday, October 18, 2013

Fancy Bows

Well it's that time where we begin decorating for the next 3 months (at least in the States). Every year my mom gets pretty serious and has me help her with window boxes. Usually only for Christmas do I need to make fancy bows, but this year I will be doing so for Halloween as well (she got some pretty neat ribbon).

The first time I ever had to make these bows, I was a bit at a loss and had to google my way through the process. This is the first bow I made in this style:

and a picture of the entire window box n_n
In order to help anyone else that may be stumbling their way through the same process, I have decided to share this tutorial by Chica and Jo. The written part is very detailed and accompanied by a ton of helpful photos.

I also I found this youtube video by craftsdotcupcake that shows the process really well. She has a blog too full of other crafty ideas and tutorials.

I will make a small note...sometimes the ribbon you want to use doesn't lend itself to this specific design of bow. The ribbon I am using for the Halloween bows for instance is much to wide. I could make a bow in this style but it would be ridiculously wide. It also lacks wire, which I find lends itself to this bow style the best. Because of this, we had to settle for a different bow for the Halloween window boxes:

My mom's display in the front garden
For this bow I just looped the ribbon in an S instead of an O as in the tutorials, and because there was no wire edging the loops only spread a little bit which created a more "normal" style of bow.

Wednesday, October 16, 2013

Handmade for Adults

I thought now would be a good time to take advantage of Shop Info Wednesday to remind you that while most of my stock and products are for infants, I can and will venture beyond that scope. I can make items for older kids, adults, household use, and even decoration. In fact, this is my usually fare for non-shop projects (just ask my friends and family...they receive a lot of them!).

Would you like some examples*? OK!

One of the gifts I give that get rave reviews are actually wash cloths...seriously. They are knit from cotton and have a decent texture for scrubbing if necessary. My mom asks for more all the time! I've started expanding them in to kitchen and bath sets as well

I also make clothing and accessories that will fit anyone from baby to adult, although there are some caveats to that. As I have designed very few items myself (especially clothing-wise), I am limited to patterns where the designer has given express permission to sell items made using that pattern. Unfortunately this means you cannot just link me to a pattern and request I make it for you and get paid...I want to respect the designer's rights. As such, some projects you may see on my flickr, blog, or Ravelry may not be reproduceable for purchase. However, I am willing to help you find a pattern that I can sell items from and work with you from there.
In fact, there are some items that can be easily designed without infringing on designer rights. For example: socks, mittens/gloves, hats, and scarves. There are many basic patterns or formulas and a variety of free stitch patterns (e.g. cables, checked, lace) that can be fairly easily implemented into these items. I am actually working on a project right now involving 6 pairs of mittens in the same 3 colors but with varying stitch patterns (more on this next week!)


*If you want further examples, check out my flickr...I am slowly updating it to have all my Ravelry projects and shop products in there.

Friday, October 11, 2013

Free Pattern Friday: Katamari Edition

Last year I made my 19 year old brother a Katamari set for his birthday. Lucky for me, my brother is awesome and totally appreciates hand crafted items. Now he is picky, so I only make things he specifically asks for (or otherwise obviously implies) he wants. I had shown him the magnetic Katamari ball, because this is one of his favorite games, and he thought it was very cool and practically demanded one. The Prince not so much, but he's like me in some regards so I knew he would appreciate the set (and he did! They now have pride of place on his speakers).

Now the patterns came from two different sources, so you get a twofer today n_~

Amy Shimel's Magnetic Katamari pattern is posted on her blog and very easy to follow. You only need to know single crochet and increases (and how to start working in the round, Amy recommends the magic circle), as the ball itself is made in two halves.

She does recommend a certain type of magnet (Darice 3/4" which come in a pack of 8 for $2.50, but you will need 28 magnets so that is 4 packs). This is because she had come across other magnets for better prices (50 for $5), but they were not strong enough. Now I couldn't find the Darice magnets, and Hobby Lobby is the most convenient craft store for me to get to (it's just 2 blocks away from my work...also I am lazy and don't like to drive out to Michael's or JoAnn's unless I have another purpose). They carry a generic (Tree House Studio) brand of ceramic magnets with a magnet strength of 6, and they worked just fine. You can get 8 for $2.50 or 50 for $7.99, so this is another option for you or just some info on the kind of magnet that works.

Check out Amy's pattern and make your own magnetic Katamari. Then have tons of fun playing with it!

Keiko Kikuno's Katamari Damacy Prince pattern is also free. I found it on Ravelry, but it is hosted on Google Docs so anyone can access it. I found it pretty easy to follow and only changed one thing. Most amigurumi worked in rounds is worked in spirals, which is fine for solid colors, but color changes can lead to not quite perfect shapes. In the pattern the face is worked into the head, so the peach patch becomes more of a rhombus. The edging can probably correct this, but I opted to make the head solid green and make a flat rectangular patch to sew on for the face (12 stitches by 12 rows).

Check out the patterns, and the games! They are generally goofy, but a lot of fun (for beginner and advanced gamers). If you make your own toys, please share and make sure to tell the designers you liked their work!

Wednesday, October 9, 2013

Shop News

Hello everyone!

It's been just over a year since I relaunched my shop on etsy. It was a soft opening, but things have picked up over time and everything is going rather well right now. I'm not super busy, which is good because I am not swamped and I have time to get all my orders done, but I wouldn't say no to a few more customers.

The holiday season is slowly closing in, and I thought now might be a good time to shake things up a bit and try to get some social networking going on. I'm still working out the specifics of how to set this up in etsy, but I am planning a few promotions:

First Time Customer
If it is your first time ordering from Handmade by Caitlin, you will receive free shipping.

Referrals
If you follow me on etsy, Facebook, twitter, or Google+ and refer a friend, you will both get a 10% discount on your next order! Network user name will be needed for confirmation of course, and your friend need only enter your name in notes to seller upon their first order. You will both then receive a code to use on your next order.

Free Holiday Plush
If you spend $30 or more at my shop, you will receive a small holiday plush for free. (I am still working out which one(s)...if multiple you may have choices!)

Other Ideas?
If you have suggestions on offers or promotions you would like to see, products you want available, or if you just have fun ways of sharing my shop, post them here! Remember, my shop is all about YOU! I wouldn't be here without you, so I want to know what you want and what makes you happy n_n

Friday, October 4, 2013

Free Pattern: Fierce but Friendly Dragon

This week's free pattern is a bit more advanced, but still adorable. Last year I participated in a Harry Potter swap (Ravelry is full of swaps, and if you are a member I highly recommend the Odd Duck Swaps group...3 new themes every month and they are very good about making sure everyone gets their package). Anyway, I made this little guy as part of the swap, because dragons.
Now this pattern does assume you have a decent knowledge of and comfort level with crochet, so unfortunately I would not recommend this for a beginner. However, I would not say it is overly advanced either.

The pattern is LucyRavenscar's Fierce Little Dragon. This link is to an updated version made available as a free Ravelry download. It is well written and formatted (printer friendly!), and I found it rather easy to follow. If you are not on Ravelry, you can get the original version of her pattern as well, but it is not as clear or easy to follow.

Wednesday, October 2, 2013

More Custom Order Reveals

The turtle plush I made last week and posted teasers of on facebook is finished. The little girl it was given to loves it and I am told the little guy has made it as a bed toy.
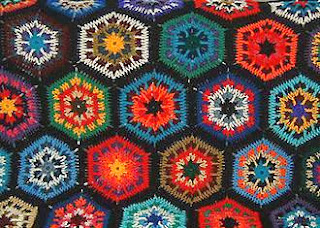
I had already had a second order sight-unseen for another one, and when this little guy was delivered the requester confirmed wholeheartedly that she wanted one. The next turtle will be in the typical greens and tans. Later that evening I got an order for a second one with a slightly different theme. The turtle will be green, and his shell will be made to mimic native american motifs. I am thinking this granny square/hexagon pattern will achieve that:
blanket (c) Avalanche on ravelry

The Three Strikes for Sean donation was picked up yesterday. The lady who had reached out to me was happy with the results.

It is also time to start thinking about Christmas gifts! I know, I have almost 3 months, but I make most of my family's gifts (at least the girls, so that's mom, grandma, sis 1, and sis 2...maybe the boy's mom, grandma, and sister...whew!). My one sister has already given me her knit item wishlist! Luckily, she wants fairly simple things (and she knows it, and she knows I need time to work, so I love her not only for her choices but early notice n_n). I still need to plan out the others...

My shop is also picking up speed. It's still mostly local and in person orders from family, friends, coworkers, and friends of acquaintances but the online sale trickles in here and there. I am hoping to come up with some cute Christmas and winter themed items as well, once I finish up the sets and custom listings I have planned to work on this month. So hopefully between my connections and the upcoming Christmas season, things will be getting busy on the shop front too!

Oh, the holiday season is upon us and it's not even Halloween*!

*stay posted for a Monday post about Halloween at my house...we are hard core!

Friday, September 27, 2013

Free Pattern: Amigurumi Cupcake Tutorial

This is the tutorial I used to ease my way back into crochet after 10+ years of having not done it. My grandma taught me way back when, I want to say I was 8. I kept it up for a little bit, but we moved when I was 10 and I hadn't touched any yarn craft until I was in my early 20s (I believe I was 21 or 22). I started up again with knitting, but wanted to get back into crochet as well. I kept having this problem of my work getting narrower as I went (a problem simply solved by remembering to chain at the start of every new row lol). This tutorial was appealing because 1) it is worked in a spiral, so no starting new rows! and 2) I always wanted to get into crochet plush.

Ignore the awesome quality of a webcam photo n_~
I sent him to my grandma and never got better pics
This pattern was very easy to follow and a great use for scrap yarn. The only stitches you need to know are chain, single crochet, and increase (Knit Simple has a great illustrated guide to crochet). You also need to know decrease if you make the cherry, but I opted not.

The only tricky part might be learning the magic circle technique, although nimoe links to my favorite tutorial for it. If you find that technique a bit daunting, you can just chain 2 and work all your round 1 single crochets into the second chain. It's the same effect, there is just a possibility of  small hole using the chain method versus the magic circle method which allows you to cinch that hole closed.

If you want to make this guy, or just take your first venture into the world of amigurumi, I highly recommend nimoe's Amigurumi Cupcake Tutorial. She takes you through step by step with clear instructions and lots of pictures. She even shows you how to weave in your ends, do a simple straight stitch embroidery, and seam the top and bottom together.

For those of you who don't need a tutorial but still want the pattern without all that extra fluff, here is a version nimoe has of the pattern only.


Friday, September 20, 2013

Owl let you in on this little secret...

Amigurumi is the art of making crochet plush. However, not all these plush need to be made of many parts, involve complicated instructions, or even take a long time! Brigitte Read's Owlettes are one such pattern. They are stated to only take and hour and a small amount of scrap yarn (plus some stuffing and eyes). And they are darned cute to boot.
(c) romansock
I have not made one of these little guys yet, but I do plan to soon. One thing I will note, having looked over the pattern, the designer does assume you have a basic understanding of crochet. This is a very simple project, an would not be bad for beginners, but you will need to look up a few other things.

To give you a hand, I decided to summarize here. Click on each term for a link to illustrated instructions.

DEFINITIONS
Slip Knot: Basically an adjustable loop made to slip over your crochet hook
Chain: Wrap the yarn around your hook (yo), and pull this through the loop on your hook
Single Crochet (sc): The most basic of crochet stitches, made but pushing your hook through a space/stitch on the previous row, doing a yo and pulling it through the space you put your hook into (giving you 2 loops on the hook), then doing another yo and pulling the yarn through the 2 loops on your hook
Increase (inc): This is done by working 2 sc into the same space/stitch on the previous row/round
Decrease (dec): This is done by working 1 sc until the final [yo, pull through 2 loops]. At this point you will begin the next sc, stopping at the same point. Now you will yo and pull the yarn through all 3 loops on the hook. One decrease stitch is worked into two stitches of the previous row/round.

TECHNIQUES
Working in a circle: For this pattern, we are working in a spiral, which means you just keep going (no joining, chaining, or turning). Essentially, each round you are increasing by the number of stitches you originally started with. In this pattern you start with 6 sc, so each round you will increase by 6. The way to do this evenly is be evenly spacing the increase, for example:
Round 1: 6 sc..................................................6 stitches
Round 2: (inc) 6 times....................................12 stitches
Round 3: (1 sc, inc in next stitch) 6 times........18 stitches
Round 4: (2 sc, inc in next stitch) 6 times........24 stitches
etc.
When it comes time to decrease for the top, you will work in the same way but in reverse until you end by decreasing 6 times.

Making the body as tall as it is wide: You can do this by measuring, of course. Another option is keeping track of how many rounds you worked making the bottom, then multiplying that by 2. So for example, if you started with your 6 sc and increased for 4 rounds, that's a total of 5 rounds. Multiply that by 2 to get 10; this is how many rounds you want to work until you start to decrease.

Decrease by skipping the ch 1: The owl's body is worked in rounds instead of rows. Usually rounds are worked as spiral to make the crochet look seamless, however flat crochet is worked in rows. At the end of a row you must turn your work and go back the other direction, but when you do this you also ch 1 in order to bring the yarn above the previous row so that you can start a new one. When you do this, you would decrease as described above. However, if you skip the ch 1 when working flat you are forced to skip the first stitch after you turn your work

NOTES
The directions say to begin by chaining 2, then crocheting 6 into the 2nd chain. An alternate option, one which I prefer, is crocheting 6 sc into a magic circle. I like this technique because it eliminates holes, which can sometimes occur when working a large amount of stitches into one chain to create a ring.

Magic Circle: a technique where you create a ring with your yarn tail, and work your stitches into it. This allows you to pull the yarn tail to cinch up the center of your circle.

Wednesday, September 18, 2013

So many projects!

As I mentioned Friday, I ran out of time for designing and making the Curious George plush and toddler sized yellow hat. However, that doesn't mean I've been doing nothing all this time n_~

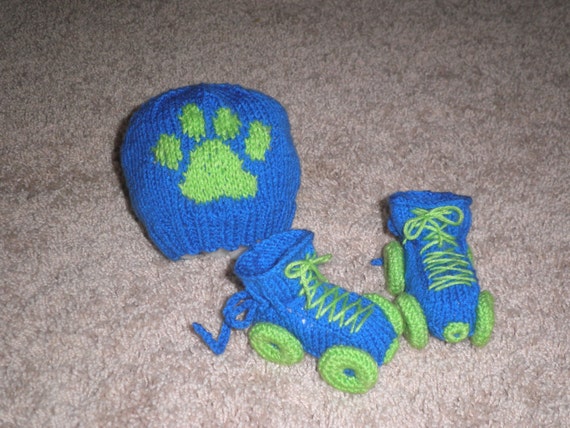
Last week I completed the Paw Print Beanie and Roller Skates gift set. It turned out pretty darned cute, if I do say so myself. The person that ordered the set just loves it--I can't wait to hear the reaction of the person she is gifting it to!

I am also finishing up my donation items for Three Strikes for Sean. This is a local fundraiser trying to help raise the money needed for his extensive doctor visits, treatment, and medications. A group shot of the donation coming soon, but in the meantime here is a collage:

I am also still working on that turtle plush (sadly no progress pictures yet). He isn't even done, and I already have a duplicate order request! So once this little guy gets assembled, I will be making another one in all greens! 

Since the Curious George set was not going to happen in time for this Saturday, I had to come up with another gift. I mentioned Friday I have been obsessed with dinosaurs. I changed things around a bit and now I am making a dinosaur play mat with some plush dinos (from Planet June's Dinosaurs Set 1). I am very excited about the mat, and am buying the fabric tonight after work. I will be a circular mat that plays on colors and textures:
  • the ocean will be blue satin because it is smooth
  • the beach will be tan felt because sand is soft but has a texture
  • the beach will also have a felt cave for the dinos
  • the grass will be green fleece because it is tall and fluffy like grass
    (and less messier than faux fur, which I also considered)
  • the grass will also have a crocheted palm tree
  • the rocky mountain are will be brown canvas because it is stiff like rock
  • the mountain area will also have a crochet volcano, complete with lava

I haven't decided yet if the terrain features should be secured to the mat. The cave should be, but we will see how placement of the tree and volcano work out. They might have velcro to keep them in place, but also allow for ease of packing.

I am rather happy with my plans for packing up the play mat. I want to make a white backing for the mat, which will also function as the outside, that looks like an egg shell. There will also be a drawstring that runs around the mat--it will lay flat on the mat when it is in play, but it will allow you to cinch the whole mat up into a bag and function as a handle for clean-up or transportation.

I haven't figured out the size yet, so will be overcompensating when I buy fabric. If there is enough left over, I may be making a second play mat for the shop! I feel like George and a child's yellow hat may also be showing up sometime in the future, if not ready-made then available to order at least n_n


Friday, September 13, 2013

Free Pattern Friday: Pattern Palooza!

So, in realizing my friend is hosting her son's 2nd birthday party THIS SATURDAY!, I decided I should probably get my butt moving on his gift. I originally wanted to make him a Curious George plush and his own yellow hat, but I don't think a week is enough time to design them (as I wasn't finding a monkey pattern I liked enough to adapt, and I couldn't find any yellow hat patterns). Since last week I've been obsessing about dinosaurs though, so now I am thinking of making a few small plush dinos for a play set, and probably a hat or something for the kiddo too.

Don't worry--George and the yellow hat will still happen. I got the idea because that is his party theme, but I can't just drop it. Maybe he'll get a George themed Christmas gift, or maybe they will go up in the shop...who knows! I've got time now to design at least, and this crazy expansion/relocation project at work is almost done so I'll have even more time to boot!

So, now in dinosaur mode, I turn to one of my favorite sites, Ravelry, and do a generic search for dinosaur. There are so many cute (and relatively simple, it seems) plush toys. A lot of them from one of my favorite crochet/amigurumi sites Planet June. This link takes you to her free patterns (omg, she made a Lemming!). She also has paid for patterns, and a ton of tutorials. I can tell you from experience that her instructions are incredibly clear and she will explain specific techniques at times (if not in the pattern, then on her blog).

I highly recommend you check out Planet June for your amigurumi needs.

Wednesday, September 11, 2013

Already Planning for October

If you are keeping up here and read last week’s Shop Info post, you know that I have enough custom orders to keep me working for the rest of the month! However, I still have tons of ideas for regular shop items for all of you to enjoy without having to make a special request. Next month I am hoping to have enough downtime to get to such ready made items for my shop including:

Wall-E Set: Eve cocoon & Wall-E plush
also listed separately: 
Eve cocoon
Wall-E plush


Minion Set: Minion hat, Gru logo overalls, banana plush/rattle
(you pick: 1 or 2 eyes)
also listed separately:
Minion outfit (hat & overalls)
Minion hat


Yoda Set: Yoda ears hat, Jedi robe/kimono top, light saber plush/rattle
also listed separately:
Yoda ears hat
Jedi robe/kimono top
light saber plush/rattle


Customizeable Roller Skates: Black or white skate boot with choice of wheel/lace/stopper color
(made to order, 5 day wait time)

Customizeable Chucks: Standard white sole and black stripe with your choice of shoe color
(made to order, 3 day wait time)

Customizeable Mary Janes: Standard white sock with your choice of shoe color
(made to order, 3 day wait time)

I'm hoping to get the first three sets finished early in October (or even late September if I have time!) as I think they would be great for Halloween. If you are interested in any of these, please contact me and instead of a ready-made item for the shop, I will do a custom order for you!

Monday, September 9, 2013

Lemon Raspberry Pie

Back in May, my sister's friend made a wonderful Lemon Raspberry Pie for her birthday. After weeks, maybe even months, of not hanging out some of my girlfriends and I decided to get together for dinner last Wednesday. I thought it would be a fun treat to bring dessert, so I decided to try and duplicate that pie.
I used a short bread crust recipe that I found on All Recipes. There was a little bit left over, so I got about 9 cookies out of it as well. This shortbread is delicious! I highly recommend it.
my first (somewhat blind) attempt
after I broke down and went to the store for more raspberries and a lemon
For the rest of the pie, I followed a recipe I found at Very Best Baking. I'm not quite sure this is the recipe my sister's friend used, but it sounded very similar. It also tastes very similar. In hindsight I probably could have asked her, but after some googling I found a bunch of almost identical recipes and I know she found it online so...that was that! The only thing I did different was use raspberry preserves that had seeds and left out the lemon zest (because I bought the supplies before looking up recipes...I know, bad form >.<).

A had a few hiccups...not quite enough Cool Whip as I was using leftovers from a 16oz tub I bought earlier this summer, and the raspberries I bought on Sunday had already started to go bad by Tuesday! This was the most disappointing. I only had about half my container, so I broke them apart to better cover the bottom of the crust, and I set aside 6 small ones for decorating the top. The Cool Whip situation was easily overcome by making a thin topping and not quite going to the edges which gave a nice yellow perimeter from the lemon cream.

I wanted to do the scalloped crust, but my pie plate has no lip so there wasn't even a way for me to attempt and fail (although Susann says it is super easy as you basically pinch and pull the peak while pushing in the V).

The results were just as delicious as I remember, if not quite as fancy looking n_n
Susann's Pie

Friday, September 6, 2013

Free Dinosaur Plush Pattern

Welcome back to Free Pattern Friday. This week's installment is for a knit dinosaur plush pattern that I found online. I have not made him (yet!), but I did read over the pattern and it seems pretty simple and straight forward. There is some shaping and he is knit in the round, but an advanced beginner should not have much trouble.
photo (c) Ruth Jenkinson

I'll report back when I have time to make him for myself too! (Although, if I change my idea for little E's birthday gift...maybe he will get made in a week or two n_n We shall see...)

Wednesday, September 4, 2013

More Custom Orders

Wow! I was expecting September to be a slow month, but the requests just keep coming in! This is great news for the shop, although it is pushing back my planned ready-made and customizeable items. Don't worry though--those ideas are still there and just keep growing over time!

So last week when I was delivering the First Grandson set, another coworker saw the cap and asked if I could make one for her son now that fall is coming up. She was thinking navy, but left the color choices up to me. I went navy with a gold border. I delivered it yesterday and she was thrilled! As an added bonus, she had just picked up a fall shirt in the same colors so now her little boy has a fall outfit n_n

The customer that ordered the penguin plush for her niece, just put in another request for a turtle plush for her daughter. At first she asked for the turtle to be green, but then she mentioned her daughter's favorite color is purple. I decided to go with a sea foam green body and a purple granny square shell.

Another request that came in last week was for a pair of skates and a beanie with a paw print, in blue and green. We decided on royal blue skates with neon green wheels and laces, and a royal blue beanie with neon green paw print. So far these are still in the designing phase, but I've got the hat chart figured out at least.

The train set is still in the works, but has gotten pushed back. Luckily this is an order for a friend and she has no real due date. It is just a gift she wants to give, and unless she wants to wait until Christmas there really isn't an event as the baby was born in spring (the request came though during summer). Everything is designed, I just want to get the baby's current age so I know what size to make the conductor's hat.

I am also working on a personal project for a friend. Her son turns 2 this month and his party is Curious George themed. I definitely want to do a George plush, but am playing around with ideas to go with it. Currently I'm debating between a yellow hat or a cardigan.

I also think I've finalized the 3 Strikes for Sean donations. I decided to make two pairs for boys and two pairs for girls. For the boys I am sending in soccer cleats (in white and red), and Chicago Bears logo cuffed booties. For the girls I am sending in purple mary janes and pink flower sandals.

And that should take us through the end of September! Whew...

Monday, September 2, 2013

Happy Labor Day!

I hope you all have been enjoying your long weekend (at least those of you also residing in the U.S.). My boyfriend came home from university to visit so we spent every day seeing a different group of friends. It was a ton of fun.

I went out and saw World's End on Friday. That was a really funny movie, as to be expected of Simon Pegg and Nick Frost. It was a little sadder/darker at some instances than I would have expected, and there were definitely some twists I didn't see coming, but it was still a lot of fun. There were also a ton of British actors that I recognized in this movie.

Saturday and Sunday were game nights with different groups. Cards Against Humanity was Saturday, and Settler's of Catan and Munchkin (plus Fu and Impossible in one game!). Both were good fun. Even though we finally figured out In the Year of the Dragon back in July, we have yet to play it again with other people. Maybe next game night...

Today the boyfriend went back to Macomb, so I spent the evening with a buddy of mine. I introduced him to the British TV show Spy and he is now hooked! It is a very funny show and streaming for free on Hulu. We also spent the evening knitting. I finished up a hat for an order and started playing around with color schemes for a plush turtle that is due by the 27th. More on those Wednesday n_n

Well that is all for today, see you Wednesday with a progress report on my shop and orders!

Friday, August 30, 2013

Free Flower Fairy Pattern

This week I am going to share a pattern by one of my favorite amigurumi designers, Mia Zamora-Johnson. She's got a few free patterns, but it is rare that one is a doll she has designed. Mia's dolls are some of the cutest I've seen. Anne Geddes fans will love them! She's got regular dolls, character dolls, dolls dressed as fruit/veggies, dolls dressed as flowers, and dolls dressed as animals.

This week's pattern is for a flower fairy, and she is so cute! Mia's instructions are always very clear and easy to follow. She even gives you tips on how to embroider the hair, which is very helpful and not all that common. I haven't made a flower fairy yet, but below is a picture from the pattern.
Pattern (c) Mia Zamora-Johnson
Photo (c) Brandy Fortune
Get the free pattern here.

Wednesday, August 28, 2013

New Custom Orders

I'm back in action! Well, I always have been working on orders, but we are expanding the one building at my day job and relocating most of our 450 employees and I have been enlisted to help facilitate the relocations. Unfortunately, this leaves very little time for blogging. I usually get Mondays blogged due to the weekend, but even this week that got overlooked.

Anyway, I did some rearranging of my schedule and pushed the Train Gift Set to the end of this month and worked on the First Grandson Set and Penguin Plush first. I did this because work has been crazy and these two orders had hard due dates, whereas the other was a request from a friend for no particular date.

So, the Penguin Plush is finished and posted for the buyer. He turned out pretty cute. I was a little sad that the girl it was for didn't want any different colors (she looked at her aunt like she was crazy when asked what color her penguin should be...obviously its black! oh little girls...), but he is still adorable.

The First Grandson Set is also finished and posted. I happened to work with the buyer and have already given it to her due to her daughter being induced Monday night! (Her due date was September 16th). I finished up adding the name to the blanket Monday night and brought it in Tuesday to show the buyer and verify that she was happy with it, and she just popped over to give me the news so I gave it to her. That was very lucky timing!

Tonight I will get moving on the Train Gift Set. It will consist of a conductor style hat, train plush, and train blanket. This is a mock-up from the chart I improvised for the blanket, and the plush will look like the engine from the blanket. I'm very excited to get going on it n_n

NEXT WEEK be prepared for another baby hat and some peeks at a few other projects. My friend's son turns 2 next month and his party is Curious George themed, so I wanted to make him a Curious George and maybe a sweater or yellow hat. I also need to start designing my items for Three Strikes for Sean. If you have suggestions please comment; I am aiming for 4 pairs of footwear (2 for girls and 2 for boys).

AFTER ALL OF THAT I will be getting back to designing items for the shop: customizeable roller skate booties, Minion hats and outfits, an Eve cocoon, and a Wall-E plush just to name a few. Remember I will fulfill any request and I love general suggestions for my shop. I want to make the items you want to buy, so your opinions are very important to me.

See you Friday with a new free pattern!

Monday, August 19, 2013

Bento for Lunch

I guess I will follow the trend. I promise it's Random Monday, not Health Food Monday, but these just seem to be what I am thinking about lately. It's probably all this getting serious about being fit. Although...if this trend keeps up maybe I should dedicate a day to health & fitness. What do you think?

So...bento. What is it? In the simplest of terms, bento is a packed lunch. A bit more specifically, bento is a Japanese style of packed lunches. In Japan there are convenience store, or pre-packed, bento as well as homemade. Bento actually has a rather elaborate history, and today it is a rather common sight in the Japanese schools.
Bento wrapped in furoshiki
Bento in drawstring bag
The reason I like bento so much (aside of my infatuation with the Japanese culture--blame that on my best friend in grade school having moved here from Japan and me being immersed in the culture at her house n_~), is the portion control. My favorite bento box is two tiers, measuring 3.3 inches l x 4.3 inches w x 3.5 inches h. I know this sounds very small, and indeed it looks very small, but you would be surprised how much food you can actually fit into it!
My favorite bento!
A better view of both tiers
The top tier of the bento holds 1 cup, and the bottom tier holds 1.5 cups. I find that either tier is plenty big enough to hold a decent sized side salad. I know it sounds and will look small, but if you were to take the salad out of the tier and put it onto a salad plate you would be quite pleased with the result. I often stick with the smaller tier and put salad dressing in a small 1 Tbsp container, which is just enough.
Salad in bento tier

Same salad on salad plate
(on top of dinner plate for reference)
The other tier is actually large enough to hold a small sandwich and a few grapes or cherries. You could also fit a wrap, an egg and veggies, humus with veggies and crackers, pasta, etc. The options are endless. And you don't have to stick with a salad. I've done a meat in the small tier with side veggies in the large tier (usually my packing of leftovers). You could also go a more traditional route in which the small tier holds rice and the large tier holds sides (stir fry, meat, veggies, eggs, etc).
L: egg, cucumbers with hummus
R: wrap, and cheese wheel
The same lunch on a dinner plate.
Perfect portion size :)
L: egg, strawberries, cheese & crackers
R: salad & dressing cup
L: pork & veggie stirfry
R: rice & soy sauce
Bento is just breaking into the non-western world, so sometimes it is hard to find "traditional" bento boxes. My favorite place to buy online is Bento USA. They have great prices and pretty fast shipping. You will also get an idea of the fun accessories that exist for bento (as moms may make character, picture, or other themed bento for their children--they get pretty elaborate!). Another good place to find some neat, although a bit pricey, bento is JBox.

If you are interested in bento, don't feel like you need to buy a special box! There are plenty of alternatives like your normal Tupperware. There is a really neat Tupperware like set that you may want to look into called Easy Lunch Boxes. It really doesn't matter what you use, and you don't have to make it cute. Just be aware of your portion sizes--smaller containers aid in this.

Another thing is variety. I've heard it said that Japanese mothers want their children's lunches to be colorful (no I don't know how accurate this is, sorry). This actually isn't a bad plan. Color means fruits and veggies, it means variety of foods, it means not everything is a starch. Variety, particularly of healthy options, is also another thing to be aware off. I find the smaller boxes help with this as well. You are trying to make your lunch colorful, so you don't pack as much of one thing (specifically starches & proteins).

Do you bento? What are your tips and tricks? Any favorite sellers, items, or accessories? What about food choices or recipes? Share them in the comments!