Wednesday, October 2, 2013

More Custom Order Reveals

The turtle plush I made last week and posted teasers of on facebook is finished. The little girl it was given to loves it and I am told the little guy has made it as a bed toy.
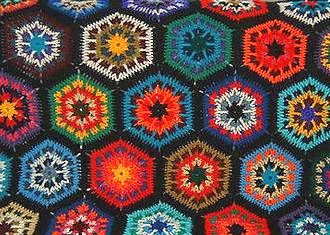
I had already had a second order sight-unseen for another one, and when this little guy was delivered the requester confirmed wholeheartedly that she wanted one. The next turtle will be in the typical greens and tans. Later that evening I got an order for a second one with a slightly different theme. The turtle will be green, and his shell will be made to mimic native american motifs. I am thinking this granny square/hexagon pattern will achieve that:
blanket (c) Avalanche on ravelry

The Three Strikes for Sean donation was picked up yesterday. The lady who had reached out to me was happy with the results.

It is also time to start thinking about Christmas gifts! I know, I have almost 3 months, but I make most of my family's gifts (at least the girls, so that's mom, grandma, sis 1, and sis 2...maybe the boy's mom, grandma, and sister...whew!). My one sister has already given me her knit item wishlist! Luckily, she wants fairly simple things (and she knows it, and she knows I need time to work, so I love her not only for her choices but early notice n_n). I still need to plan out the others...

My shop is also picking up speed. It's still mostly local and in person orders from family, friends, coworkers, and friends of acquaintances but the online sale trickles in here and there. I am hoping to come up with some cute Christmas and winter themed items as well, once I finish up the sets and custom listings I have planned to work on this month. So hopefully between my connections and the upcoming Christmas season, things will be getting busy on the shop front too!

Oh, the holiday season is upon us and it's not even Halloween*!

*stay posted for a Monday post about Halloween at my house...we are hard core!

Friday, September 27, 2013

Free Pattern: Amigurumi Cupcake Tutorial

This is the tutorial I used to ease my way back into crochet after 10+ years of having not done it. My grandma taught me way back when, I want to say I was 8. I kept it up for a little bit, but we moved when I was 10 and I hadn't touched any yarn craft until I was in my early 20s (I believe I was 21 or 22). I started up again with knitting, but wanted to get back into crochet as well. I kept having this problem of my work getting narrower as I went (a problem simply solved by remembering to chain at the start of every new row lol). This tutorial was appealing because 1) it is worked in a spiral, so no starting new rows! and 2) I always wanted to get into crochet plush.

Ignore the awesome quality of a webcam photo n_~
I sent him to my grandma and never got better pics
This pattern was very easy to follow and a great use for scrap yarn. The only stitches you need to know are chain, single crochet, and increase (Knit Simple has a great illustrated guide to crochet). You also need to know decrease if you make the cherry, but I opted not.

The only tricky part might be learning the magic circle technique, although nimoe links to my favorite tutorial for it. If you find that technique a bit daunting, you can just chain 2 and work all your round 1 single crochets into the second chain. It's the same effect, there is just a possibility of  small hole using the chain method versus the magic circle method which allows you to cinch that hole closed.

If you want to make this guy, or just take your first venture into the world of amigurumi, I highly recommend nimoe's Amigurumi Cupcake Tutorial. She takes you through step by step with clear instructions and lots of pictures. She even shows you how to weave in your ends, do a simple straight stitch embroidery, and seam the top and bottom together.

For those of you who don't need a tutorial but still want the pattern without all that extra fluff, here is a version nimoe has of the pattern only.


Friday, September 20, 2013

Owl let you in on this little secret...

Amigurumi is the art of making crochet plush. However, not all these plush need to be made of many parts, involve complicated instructions, or even take a long time! Brigitte Read's Owlettes are one such pattern. They are stated to only take and hour and a small amount of scrap yarn (plus some stuffing and eyes). And they are darned cute to boot.
(c) romansock
I have not made one of these little guys yet, but I do plan to soon. One thing I will note, having looked over the pattern, the designer does assume you have a basic understanding of crochet. This is a very simple project, an would not be bad for beginners, but you will need to look up a few other things.

To give you a hand, I decided to summarize here. Click on each term for a link to illustrated instructions.

DEFINITIONS
Slip Knot: Basically an adjustable loop made to slip over your crochet hook
Chain: Wrap the yarn around your hook (yo), and pull this through the loop on your hook
Single Crochet (sc): The most basic of crochet stitches, made but pushing your hook through a space/stitch on the previous row, doing a yo and pulling it through the space you put your hook into (giving you 2 loops on the hook), then doing another yo and pulling the yarn through the 2 loops on your hook
Increase (inc): This is done by working 2 sc into the same space/stitch on the previous row/round
Decrease (dec): This is done by working 1 sc until the final [yo, pull through 2 loops]. At this point you will begin the next sc, stopping at the same point. Now you will yo and pull the yarn through all 3 loops on the hook. One decrease stitch is worked into two stitches of the previous row/round.

TECHNIQUES
Working in a circle: For this pattern, we are working in a spiral, which means you just keep going (no joining, chaining, or turning). Essentially, each round you are increasing by the number of stitches you originally started with. In this pattern you start with 6 sc, so each round you will increase by 6. The way to do this evenly is be evenly spacing the increase, for example:
Round 1: 6 sc..................................................6 stitches
Round 2: (inc) 6 times....................................12 stitches
Round 3: (1 sc, inc in next stitch) 6 times........18 stitches
Round 4: (2 sc, inc in next stitch) 6 times........24 stitches
etc.
When it comes time to decrease for the top, you will work in the same way but in reverse until you end by decreasing 6 times.

Making the body as tall as it is wide: You can do this by measuring, of course. Another option is keeping track of how many rounds you worked making the bottom, then multiplying that by 2. So for example, if you started with your 6 sc and increased for 4 rounds, that's a total of 5 rounds. Multiply that by 2 to get 10; this is how many rounds you want to work until you start to decrease.

Decrease by skipping the ch 1: The owl's body is worked in rounds instead of rows. Usually rounds are worked as spiral to make the crochet look seamless, however flat crochet is worked in rows. At the end of a row you must turn your work and go back the other direction, but when you do this you also ch 1 in order to bring the yarn above the previous row so that you can start a new one. When you do this, you would decrease as described above. However, if you skip the ch 1 when working flat you are forced to skip the first stitch after you turn your work

NOTES
The directions say to begin by chaining 2, then crocheting 6 into the 2nd chain. An alternate option, one which I prefer, is crocheting 6 sc into a magic circle. I like this technique because it eliminates holes, which can sometimes occur when working a large amount of stitches into one chain to create a ring.

Magic Circle: a technique where you create a ring with your yarn tail, and work your stitches into it. This allows you to pull the yarn tail to cinch up the center of your circle.

Wednesday, September 18, 2013

So many projects!

As I mentioned Friday, I ran out of time for designing and making the Curious George plush and toddler sized yellow hat. However, that doesn't mean I've been doing nothing all this time n_~

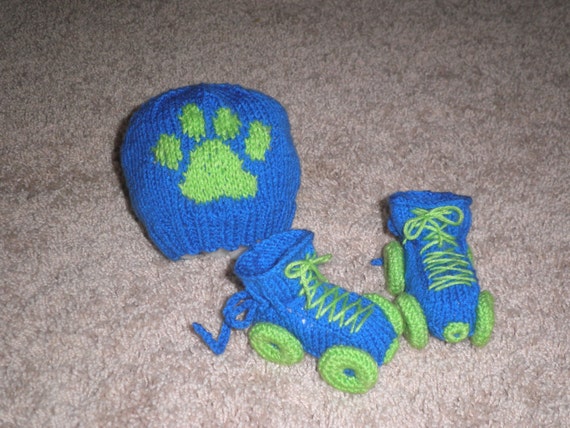
Last week I completed the Paw Print Beanie and Roller Skates gift set. It turned out pretty darned cute, if I do say so myself. The person that ordered the set just loves it--I can't wait to hear the reaction of the person she is gifting it to!

I am also finishing up my donation items for Three Strikes for Sean. This is a local fundraiser trying to help raise the money needed for his extensive doctor visits, treatment, and medications. A group shot of the donation coming soon, but in the meantime here is a collage:

I am also still working on that turtle plush (sadly no progress pictures yet). He isn't even done, and I already have a duplicate order request! So once this little guy gets assembled, I will be making another one in all greens! 

Since the Curious George set was not going to happen in time for this Saturday, I had to come up with another gift. I mentioned Friday I have been obsessed with dinosaurs. I changed things around a bit and now I am making a dinosaur play mat with some plush dinos (from Planet June's Dinosaurs Set 1). I am very excited about the mat, and am buying the fabric tonight after work. I will be a circular mat that plays on colors and textures:
  • the ocean will be blue satin because it is smooth
  • the beach will be tan felt because sand is soft but has a texture
  • the beach will also have a felt cave for the dinos
  • the grass will be green fleece because it is tall and fluffy like grass
    (and less messier than faux fur, which I also considered)
  • the grass will also have a crocheted palm tree
  • the rocky mountain are will be brown canvas because it is stiff like rock
  • the mountain area will also have a crochet volcano, complete with lava

I haven't decided yet if the terrain features should be secured to the mat. The cave should be, but we will see how placement of the tree and volcano work out. They might have velcro to keep them in place, but also allow for ease of packing.

I am rather happy with my plans for packing up the play mat. I want to make a white backing for the mat, which will also function as the outside, that looks like an egg shell. There will also be a drawstring that runs around the mat--it will lay flat on the mat when it is in play, but it will allow you to cinch the whole mat up into a bag and function as a handle for clean-up or transportation.

I haven't figured out the size yet, so will be overcompensating when I buy fabric. If there is enough left over, I may be making a second play mat for the shop! I feel like George and a child's yellow hat may also be showing up sometime in the future, if not ready-made then available to order at least n_n


Friday, September 13, 2013

Free Pattern Friday: Pattern Palooza!

So, in realizing my friend is hosting her son's 2nd birthday party THIS SATURDAY!, I decided I should probably get my butt moving on his gift. I originally wanted to make him a Curious George plush and his own yellow hat, but I don't think a week is enough time to design them (as I wasn't finding a monkey pattern I liked enough to adapt, and I couldn't find any yellow hat patterns). Since last week I've been obsessing about dinosaurs though, so now I am thinking of making a few small plush dinos for a play set, and probably a hat or something for the kiddo too.

Don't worry--George and the yellow hat will still happen. I got the idea because that is his party theme, but I can't just drop it. Maybe he'll get a George themed Christmas gift, or maybe they will go up in the shop...who knows! I've got time now to design at least, and this crazy expansion/relocation project at work is almost done so I'll have even more time to boot!

So, now in dinosaur mode, I turn to one of my favorite sites, Ravelry, and do a generic search for dinosaur. There are so many cute (and relatively simple, it seems) plush toys. A lot of them from one of my favorite crochet/amigurumi sites Planet June. This link takes you to her free patterns (omg, she made a Lemming!). She also has paid for patterns, and a ton of tutorials. I can tell you from experience that her instructions are incredibly clear and she will explain specific techniques at times (if not in the pattern, then on her blog).

I highly recommend you check out Planet June for your amigurumi needs.