Thursday, September 21, 2017

Homemade Bug Bite Soother

Even though summer is almost over, we are still going to have mosquitoes around for a while in the Midwest. We are on the brink of prime bonfire weather, and I always find I get the most bits while sitting around a fire with my friends.

Roll-On Bug Bite Soother

10 drops lavender essential oil
10 drops thyme essential oil
10 drops tea tree essential oil
10 drops eucalyptus essential oil
10 drops peppermint essential oil
10 drops chamomile essential oil
10 drops basil essential oil
1 1/2 tsp fractionated coconut oil (or other carrier)

First add your essential oils to a 10 ml roller ball bottle. It should be about 1/4 full. Top off your bottle with the fractionated coconut oil. This will be about 1 1/2 tsp. Shake well to mix and keep on hand for immediate relief!

This is a fairly strong dilution, and those of you familiar with essential oils will be aware that normally recommended dilutions range from 0.25%-3%. However, it is typically considered acceptable to use neat oils in a few instances, bug bites & stings being some of those. I've also personally found that I rarely need to reapply this soother at the 25% dilution (accepting for washing, etc). If you are wanting a more diluted blend, here are some general guidelines:

**Please note, this table shows the total amount of essential oils to use per 10 ml roller ball bottle.**


Thursday, September 14, 2017

DIY Dry Shampoo

I've been playing with color in my hair, and I'm talking stuff like blue/green/purple. I get the irony of using this kind of hair dye vs my other decisions to go more natural, but there you have it. In an effort to preserve the color I have been on a hunt to find the best solution. (You can read my previous post here where I discuss it.) Anyway, I've found straight up corn starch to be very good, but there was some room for improvement as I have very thick, oily hair (even after getting myself down to washing my hair 2x per week, it was starting to feel a little gross by day 3).

So this recipe is based off my personal experience and catered to my hair. Naturally, I have a rather light brown hair color, so that was my goal. This dry shampoo does still start a bit light, but I find it fades in very quickly and does not leave that greying hair look like straight up cornstarch. This also fades in very well with my current blue & purple hair.

DIY Dry Shampoo (Light Brown Hair)

2/3 c cornstarch (or arrowroot powder)
1/3 c nutmeg, finely ground
20-45 drops essential oils (optional)

Feel free to substitute the nutmeg as you see fit, based on your hair color. Cinnamon  and cocoa are good for darker hair colors, and red clay is good for redheads. You can also play with the ratio of cornstarch to color as well, for example blondes may benefit from all cornstarch.

Mix all your ingredients together. If using essential oils, you will want to mix everything in a large bowl with a whisk, making sure the oils get distributed and don't clump up (as they are going to want to do, since the cornstarch's purpose is to absorb). I usually add 15 drops each lemongrass, rosemary and lavender. Most recipes suggest about 5 drops essential oil per 1/4 cup, which is about half of what I do. I really enjoy the scent though and added more to make that stronger. I also personally feel the extra oils add some benefit, as after doubling them I notice my hair felt so much cleaner! Store in an airtight container.

To use, either sprinkle (using an old salt shaker or similar), or dust (using an old makeup brush), the powder onto your hair. Focus on your roots, although if you notice the length of your hair is starting to feel oily, feel free to apply there as well. You will benefit from a light hand, as I found when starting on dry shampoo that my hair would feel dirty later on in the day due to excess build-up of product (plus too much, and you can't brush it all out so it starts to look like you have dandruff). I usually work the dry shampoo into my scalp a little bit and let it sit a few minutes before brushing it through my hair. This also works really well if you apply before bed--you will wake up with fresh & clean feeling hair. Afterwards style as usual.


A little bit about the essential oils that I chose:
Lemongrass is an effective cleaner and deodorizer. Rosemary is said to be good for people with oily hair as it helps control sebum production. Lavender is good for people with mixed skin types and moisturizes dry skin. All 3 are known to sooth irritated/itchy scalps which will reduce dandruff. They are also said to have properties that will promote hair health & growth.

Thursday, September 7, 2017

DIY Disinfectant Wipes

As part of my move to green living, I am trying to get away from disposable items. For example, we have a basket of rags and washcloths that we use instead of napkins and paper towels. However, sometimes you just need something with a little more cleaning power. Instead of picking up those Clorox or Lysol wipes, I decided to take a stab at making my own. These work great, and once you use up the container, wash the rags and make a new solution!

DIY Disinfectant Wipes

6 flour sack towels, cut down into quarters
4 c distilled water
1 c vinegar
1 c alcohol
20 drops essential oils (optional)

If you do not have distilled water on hand, just boil 4 cups and allow it to cool. The essential oils are not required, but they will improve the disinfecting power of your solution. My default is 5 drops each of lemon, peppermint, tea tree, and rosemary. All 4 of these have antibacterial properties, but you could use any oils of your choice that have disinfecting properties, or that you enjoy the scent of.

Stuff your 24 cloth pieces into an air tight jar. Combine all your liquid ingredients, and pour over the towels. Allow the solution to soak into the towels. Keep your container well-sealed to keep the cloths damp in between uses.

For a neat dispensing feature similar to the commercial wipes or tissues, lay out your cloths in a line with the ends slightly overlapping. Make sure you overlap the same way with each piece (for example, always set the next piece to the left and on top). You will now have a makeshift strip that you should fold in half lengthwise. Stuff this strip into your container, starting with the sole cloth that was not tucked into another (for example, the right most piece). Now when you pull out your cloths, the next one will be tucked inside and pop up for easy grabbing next time.

Grab a towel as needed to wipe down counter tops and more. Do note, you need to leave the surface wet for at least 10 minutes in order for the solution to truly disinfect. After 10 minutes you can air dry or wipe up (for a streak-free finish).


I keep my wipes on the counter next to my sink, along with my basket of dry rags/napkins and homemade dishwasher detergent. What I love about all of this, is that I can just toss everything into a hamper and wash it all once full. I keep a hamper under my counter for used wipes, rags/napkins, and towels. It's convenient for everyone, saves some money, and is generally more eco-friendly (minus the laundry, but I can get by with washing all of this every 2-4 weeks, depending on how active we've been--we are only 3 adults though, so if you have little ones, you can probably expect to do the wash more frequently).

Thursday, August 31, 2017

Homemade Laundry & Dishwasher Soap

A good friend of mine has been making her own laundry soap for years, and she always spoils me with a batch. Recently she hosted a green cleaning seminar with Clean Mama herself. Feeling revitalized, and having won her Simply Clean book in a raffle, I went home and set about getting supplies to make my own cleaners! Since both the laundry & dishwasher soap contain similar ingredients, I started with a batch of each.

DIY Laundry Soap

1 bar Fels-Naptha soap (or castille soap)*
2 c borax
1 c washing soda
1 c Oxyclean (or more washing soda)
1 c baking soda
30 drops essential oil (optional)

Make sure to finely grate or chop your soap. I found that freezing it for 30-60 minutes and using a food processor to be very effective, but you could use a grater or other method. Mix all ingredients together and store in an air tight container. If using essential oils, make sure to mix in well before storing, so that the oils are evenly distributed and your soap does not clump. My personal preference for essential oils are lavender and sandalwood, but choose whatever you enjoy the scent of or find relaxing (a great choice for bedding).

Use 1 Tbsp per load. This recipe is great for top load, front load, and HE washers (I've actually tested it in all 3). For a simple, green fabric softener use vinegar in the washer as you would liquid fabric softener, or add some wool balls to your dryer (either option can be scented using essential oils as well!)

*If you are looking to create a vegan soap, be careful which bar you choose. Both Fels-Naptha and Zote use tallow, but castille bars by definition are 100% vegetable oil (typically olive oil). Some verified vegan brands of castille soap are Dr. Bronner, Kirk's, and Mrs. Meyer's. All other ingredients are mineral-based, but you may want to dig into which brands are cruelty-free.


DIY Dishwasher Soap

1 c borax (or baking soda)
1 c washing soda
1/2 c kosher salt
1/2 c citric acid
20 drops essential oil (optional)

Mix all ingredients together and store in an air tight container. If using essential oils, make sure to mix in well before storing, so that the oils are evenly distributed and your soap does not clump. My personal preference for essential oils in this application is citrus, such as lemon, grapefruit, or a blend. I currently am using a cleansing blend of lemon, clove, eucalyptus, and rosemary.

I've also seen recipes floating around that add castille soap. If you are concerned about the lack of soap vs cleaning agent, feel free to add about 1/4 cup finely grated castille soap (sorry, I'm not sure how that translates into bars as I don't add it myself). Make sure you grab castille soap, you do not want a soap that suds in this mixture!
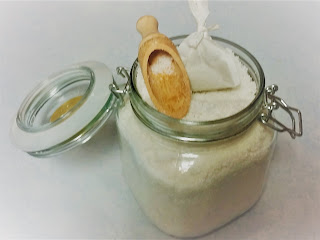
Something you will want to note is that the citric acid will attract moisture and may cause your soap to clump (or if you are really unlucky, fuse into 1 large block). This won't hurt anything, but it can be annoying and may make it harder for your soap to dissolve. Two good tips I've found are to leave your soap in a large, uncovered bowl for a couple days to let it dry out (make sure to stir it periodically to help break up any clumps), and to make a desiccant to keep in your container to absorb any excess moisture (for example powdered clay or dry rice in an empty tea bag, pantyhose, or sock).

Use 1 Tbsp per load. For a simple rinse agent, use white vinegar.


Now, there are some arguments against using Borax. I'm still working my way through the data, but as yet have not come across concrete examples of Borax actually being harmful (just some arguments that it could be). I encourage you to do your own digging as well. Crunchy Betty does a great job of collecting the arguments for both sides. That being said, I am looking into alternate solutions out of curiosity. In the meantime, I've been using laundry soap with Borax for years and have no complaints.

Wednesday, August 23, 2017

Blog Rebrand & Revamp

Hey there, loyal followers! I've been getting involved in a few different side projects, which has allowed me to centralized certain interests elsewhere. As part of a revitalized attempt to keep my side projects active, I am also revising my blog & website.

Let's be honest, this is a personal blog, it is a condensed version of all my previous blogs, and it has evolved over time. A few common themes have always been prevalent: poetry, crafting, DIY (whether that be baking/cooking, or other). With my new projects, I am able to retain a more home-centered approach. There will still be crafting & shop updates. And there are likely to be personal posts here & there. However, I am branching out to some other sites, as follows:

My Dairy-Free Adventure: a focus on DF recipes & reviews. This will not be a new home for all my recipes, but allergy-friendly ideas will move or be cross-posted.

Drink.Smoke.Games: a focus on board games, video games, and alcoholic beverages. This site will house my reviews, etc and is part of an effort to start an online presence/community of gamers. This also allows me to keep Handmade by Caitlin more family-friendly.

Movie, Knit, Dye!: a focus on knitting & horror movies. This will not take away from Handmade by Caitlin at all, but if you are interested in hand dyed yarns, or 2 goofballs commenting on horror movies MST3K style, please check it out. While our goal is to build a following for our video podcast, you can also expect to see some random things about out current listening recommendations (podcasts & movies).

So...we know some stuff is moving to these other locations. What will remain at Handmade by Caitlin? I've been getting back to my roots, as it were, with natural solutions. I feel this really compliments the DIY attitude and am going more towards that focus. You can still expect shop info to be posted here, free patterns, recipes, wellness & fitness info, and personal updates. Mostly, you can expect an update to the DIY & wellness/fitness info: natural health support, green cleaning, eco-friendly ideas, on occasion a brief foray into ancient beliefs (anthro major here, plus it is fascinating to see how old natural remedies and crafts were so societal and religion-focused).

So sit for a spell, check out the new features, and let me know what you want to see!