Showing posts with label healthy eating. Show all posts

Thursday, September 20, 2018

DIY Firestarters / Grill Lighter Cubes

If you follow me on Instagram, you have probably noticed this summer the boy & I have decided to become grill masters! Well, maybe not masters, but we have definitely made the venture into lump charcoal and are learning how to use our Weber to smoke meats. Pizza is on the agenda as well!

Even though we used briquettes for a while, the boy was concerned about how we would light our charcoal. For a while we had an electric starter, but it became cumbersome. We considered getting a chimney, but he didn't want to deal with potential unreliability of lighting paper (also he didn't want to use paper with colored ink on it, so the alternative would have been using up our printer supply). So we picked up Weber's lighter cubes, and they worked great. We could use anywhere between 1 and 3 cubes, depending on how much charcoal we were using.

After we upgraded to lump charcoal, however, we found we needed a chimney anyway because the varying sizes of each piece made it difficult to ensure an even burn. But again, the paper problem, so we kept using the lighter cubes. 1 cube was enough to get an entire chimney going. Then we ran out and forgot to get more, which almost put the breaks on our last minute steak dinner as no local stores carried these lighter cubes. Not to be inconvenienced, I decided to try out making my own.

Weber's lighter cubes are small paraffin wax cubes. You get 24 in a box for about $3-4 dollars. I don't have paraffin on hand, but I almost always have beeswax pellets these days. So I melted some down & soaked a cotton ball. It took a tad longer to light, but worked a dream. With that success, I made a whole batch!

Beeswax Lighter Cubes
100% cotton egg carton (bottom w/ no ink)
18 cotton balls
2 cups food-grade beeswax pellets


When I made my first trial, I just melted about 1 Tbsp of wax and let a cotton ball soak it up. We used it before the wax could even dry, and had no problems. However, to make a bulk batch, I knew that process would not be the most efficient, so I've refined it a bit.

In a double boiler (or you can put a heat-safe glass container in a pot of boiling water), melt your wax. This may take some time, and stirring to break up chunks can help move it along. While your wax is melting place your cotton balls into your egg carton. Once the wax is melted, pour it over your cotton balls. They will want to soak up as much wax as possible, so do your best to evenly distribute it. You may also need to flip or rotate the cotton balls.


The egg carton is totally optional here, but it made the process easier for me. Otherwise, you are stuck dipping each cotton ball into your melted wax, and then you need to find somewhere for them to dry!


Once dry, they are ready to store or use. I like to prep the carton by cutting off any extra bits along the outside and between each compartment (this allows for an easy tear-off option). Using the egg cartons vs straight up cotton balls gives you a large-ish piece, so you may be able to cut them in half and stretch them out even farther.


To use, place under your charcoal chimney, directly on your charcoal pile, or in the middle of your campfire. Light it up and let your coals or campfire do it's thing. This is organic & food-safe, as long as your egg carton does not have color ink. This is also a lot cheaper! For $10 you can get 1lb of beeswax and 200 cotton balls. I haven't done a mass batch yet, but 1lb of beeswax should easily be enough for 100 cotton balls, and honestly could probably get you pretty far into the full 200. The egg carton is optional, but if you use one it should be recycled which means no extra cost to you. For $10, you can get 50-75 of the commercial paraffin cubes...so why not make your own?

Thursday, September 6, 2018

The Kombucha Experiment

I really wanted to get on the kombucha train, but made some poor flavor decisions initially. I didn't let that keep me away though, and I tried a variety of different flavors, many of which I loved. So once I realized it was a flavor issue, and not a kombucha issue, I decided to try brewing my own.

So what's the buzz about kombucha?
Kombucha seems to be a fad right now, but really it's been around for centuries! I've read varying information about the benefits (or not) of kombucha. A summary of what I've learned is that not only do you get the same health benefits as tea (antioxidants), your gut gets some extra TLC. Kombucha contains probiotics, which make your gut happy and can aid with indigestion, inflammation, and weight loss. Other purported health benefits are improved weight loss, improved cholesterol/blood sugar, reduced risk of certain cancers/heart disease, and assistance managing type 2 diabetes.

Now I can't say for sure that all of this is true, but I know tea & kombucha have been considered health tonics for centuries. I know my gut feels better when I drink it, and I experience improved energy levels which helps me focus and be more active. I also am allergic to dairy, and tend to cheat (A LOT), and I find regular consumption on kombucha helps fight most of the negative digestive effects.

I also really like it because it's helped me kick soda. I don't drink soda for the caffeine, but for the sugar & carbonation. Kombucha is a healthier way for me to feed those desires, plus when I make it I know what has gone into it. And there is still the caffeine if that's your thing too ;)

I'm experimenting w/ making my own sodas as well, and you can totally use a kombucha brew method to give them some fizz if desired.

How do you make Kombucha?
Well, it's really a 2-step process. I am by no means an expert, but am happy to share what I've learned so far! But also, feel free to just use this info as a rough guide, and experiment with flavors, dilution strengths, etc.

I should also note there are 2 brewing methods: batch & continuous. I am currently using the batch method. If I see a need to move over to continuous, I will be sure to share that method with you in the future.

First Fermentation (F1)

1.Get a SCOBY and some starter tea.

I've read and seen posts of many people who have successfully started their own SCOBY from store bough kombucha. I've not tried this so cannot comment. I got my SCOBY from a friend who brews her own kombucha. There are also many reputable online stores where you can buy a SCOBY as well (Although I've heard you don't want to trust dehydrated SCOBYs).

The amount of starter you want is somewhere in the 1-2 cup range. My friend gave me a huge SCOBY from a 2.5 gallon crock, and 1 cup of tea. That gave me wonderful results, and for my second batch I also only used 1 cup of tea.

Once you've made your first batch, this step switches up a bit. You will now have 2 SCOBYs in your crock. Save 1 along with 1-2 cups of your F1 kombucha and start your next batch! You can put the other SCOBY into a hotel, pass it along to a friend, find another creative use for it, or simply dispose of it (they compost well).

2. Brew yourself up some sweet tea.

I've read a multitude of methods here, and for my first run I just followed the steps my friend uses. Typically, kombucha is made with black tea, but my friend uses green tea. Feel free to experiment here though, as I've seen many success stories with all different sorts of tea. My one note of warning would be to avoid teas like earl grey because the oils can mess of your brew, and herbals may not have enough tannins for the brew to be successful (however, I have also heard success stories, so you do you; I would recommend not straying from regular tea for your first couple brews).

For my first run I used about 8 bags of organic green tea, steeped in 8 cups of water for about 15 minutes. While still warm, dissolve about 1 cup of sugar. I then added another 7 cups of COLD water to help bring down the temperature, as you will want your tea at room temp for the next step.

I was told to use organic cane sugar, so that is what I did and it worked great. However I know of people who have successfully used regular white sugar, and even honey (although I believe the use of honey means you are making JUN, and not kombucha?).

These amounts are for 1 gallon of kombucha. Adjust as needed for the amount you want. My friend recommended 1 gallon per person, and since I am the only one in my house who drinks this, that is what I did. Frankly, I found this to be more than enough!

You can also adjust the type & amount of tea. Generally I see people hover around 8-10 tea bags (or equivalent loose tea) per 1 gallon of kombucha, but again this is all about experimentation so if you want to use more go for it. The flavor is pretty light at 8 bags of green tea, but that lends it self well to all sorts of flavoring ;)

What's that SCOBY doing?
3. Add your SCOBY & starter.

As mentioned in Step 2, you want to get your sweet tea down to room temp first. You can brew your sweet tea in your crock, or pour it in once at room temp. You will want to use a glass or food-safe ceramic crock or other vessel (I use a 1 gallon mason jar myself).

Once you are there, add your starter tea and place your SCOBY on top. Make sure your hands are clean before touching your SCOBY (a simple vinegar rinse is sufficient). It's OK if your SCOBY doesn't fit your crock--you can trim it down if it's too big; and if it's too small no worries, it will still do it's job and a new one will grow anyways that will fit your crock perfectly.

Don't worry if your SCOBY sinks, sits vertically, or otherwise doesn't float nicely on top. It will do what it wants. SCOBYs are living things and they will do as they please! A new one will form anyway, and as long as you see that happening you know everything is working.

4. Cover and let sit.

Cover your crock with a coffee filter or cloth (like a flour sack towel). You want the air ventilation as it helps the natural yeasts & bacterias eat the sugar and turn your tea into kombucha. Do not use cheese cloth as the holes are too large & you don't want fruit flies! Or if you do use cheesecloth, make sure to use multiple layers.

Now be patient...I've heard you should wait at least 3-5 days before checking on your brew.

5. Taste your brew.

Your kombucha is done when you decide it is. It's all about your taste preferences honestly. I would wait until you see your new SCOBY has formed before tasting (which I believe took about 4 days for me). Many people say kombucha takes 10-14 days, but you can start tasting earlier. My friend says hers only takes 7 days, so since I used her SCOBY & method I tasted mine at 7 days. I was happy with the result and decided I was done. However, for my second batch I waited 14 days to see the difference, just because. It actually had more bite, but not in a bad way. I tend to like sweet so was happy at 7 days, but I think 14 days is actually more to my liking. However, find your own sweet spot (pun intended!). The environment you store your kombucha in will impact the fermentation process, so just because 7 days was perfect for my friend at her house, doesn't mean 7 days will be perfect for me at my house. Our house environments are going to be slightly different, and also probably our tastes.

Some people do pH testing...I personally do not, but I'm also a super newbie! The longer you let it brew, the more acidic it will become. If you want it sweeter, stop brewing earlier; if you want it sour, brew it longer. Do not be put off by a funky, vinegary smell. It's all good! Well, as long as your SCOBY doesn't grow any mold. If it does, you probably want to start over with a new or reserved SCOBY.

6. Bottle & prepare for F2.

Once you are happy with your brew, it is time to bottle it up. First remove your SCOBY with clean hands. You can place this into a temporary dish, SCOBY hotel, or new brewing crock. Make sure to include 1-2 cups starter tea from your current brew.

You will now want to pour your kombucha into bottles for storing or F2. I've heard it is fine to bottle and put straight in the refrigerator if you are happy with the results. However, if you want some fizz you probably want to give it a second ferment, regardless of your desire to include flavorings.

I've read you want to give your brew a good stir before distributing it so that your yeast particles get kicked up and end up in each bottle (you can also do this before pulling your starter, but I forgot & everything still worked fine for my second batch).

L-R: Cucumber/Melon, Mango/Peach/Strawberry,
Plum/Blueberry/Kiwi
Second Fermentation (F2)

7. Prepare your flavorings, if desired.

Half of the fun of brewing my own kombucha, is being able to choose my own flavors! You can use pretty much anything here... fruits (fresh/frozen, chopped/pureed/juiced), juices, herbs, flowers, other teas (herbal or otherwise...), probably vegetables? For my first attempt, I decided to try & mimic some of my favorite smoothies:

Mango/Peach/Strawberry:
     1 mango, 1 peach, 6 strawberries
Plum/Blueberry/Kiwi:
     2 plums, 2 kiwis, 1/2 cup blueberries
Cucumber/Melon*:
     1/4 cucumber, 1/8 melon, 1 lime zested/juiced
*For my first try, I used watermelon, but my smoothies are usually honeydew. I also usually add mint & honey to the smoothies. Not sure the mint would be needed for the kombucha, but this flavor did not have a lot of fizz, so I think honey would have been beneficial.

I pureed the fruits in the same ratios I use in my smoothies, and added about 1/2 c of puree per 16 oz bottle. I probably could have gotten away with 1/4 - 1/3 cup instead (or maybe just used diced fruit instead of pureed), but my friend said she does 1 part flavoring to 3 parts kombucha, so who was I to mess with her tried & true method on my first round? Even at a 1/2 cup puree per 16 oz bottle, I had about enough to do 4 bottles of each flavor, but only enough F1 for 8-9 bottles (I only had 8 though).

For my second attempt I wanted to try something new. I used some of my brew to build a SCOBY
hotel (more on that later), and only had 2 empty bottles on hand (which is fine, I want to do some experimenting with the second brew anyway). Originally I was thinking something apple and something orange, but I ended up settling on using both bottles for an attempt at apple cider kombucha using 1/2 apple diced finely, 2 cardamom pods split, 2 cloves, and 1 cinnamon stick per bottle. I didn't think the apple would offer enough sugar, so I added 1/2 Tbsp sweetener (maple syrup for one and honey for the other).

You can realistically swap Steps 6 & 7. I personally find it easier to add my flavorings to the bottles first. My friend likes to fill her bottles with kombucha first. To each their own.

8. Add additional sugar, if desired.

Some flavors do not have as much sugar as others. Different fresh fruits have different sugar levels, Juices tend to have higher sugar (no shame in using prepared juices!). Herbs & floral flavors (or other teas) will definitely need a sugar boost.

Feel free to play with the sweetener you use. While most of the sugar is going to feed your fermentation, there may be a certain flavor profile you want.

I've also heard adding raisins helps build fizz without imparting additional flavor, so that's something else to consider. I actually gave this a try, and did not notice an impact on my flavors.

9. Cover & let ferment 1-3 days.

This step is really variable. Depending on the sugar content of your flavorings (if you used any at all), your brew may ferment at different levels. It's a good idea to check at regular intervals 1) to make sure you reach your desired fizz level, and 2) to make sure your bottles don't explode. You can help prevent exploding bottles by using grolsch style flip-top bottles, pressure tested bottles, or I have even found that commercial screw-top kombucha & ginger beer bottles are reliable.

I left all 3 of my flavors sit 3 days before checking them. The mango/peach/strawberry was so fizzy! There was a volcano when I opened the bottle. It probably could have gone just 1 day. The plum/blueberry/kiwi was also very fizzy & volcano-y, but not as much. Not sure if 1 day would have been enough, but definitely would not have gone more than 2. On the other hand, the cucumber/melon has barely any fizz! It's OK, but probably could have gone another 1-2 days, or used some additional sugar (like honey or more raisins).

You can strain & rebottle your brew if desired, or leave as is. It won't hurt either way, although you may sacrifice some of the fizz if you strain & rebottle (not always an issue though!).

10. Refrigerate until you are ready to enjoy!

Once your bottles have reached their desired level of fizz, place them in the refrigerator. This not only stops further fermentation, it helps the carbonation better integrate into the liquid which can help prevent volcanoes when you open your bottles ;) Also, I personally find my kombucha most enjoyable when cold, but then again I like most drinks cold.

If you did not strain your brew in the previous step, your kombucha may be a a bit textured...You can strain prior to enjoying or drink straight. There is a possibility a baby SCOBY has formed. That is fine. It's safe to eat/drink, or you can discard it. Do not use these baby SCOBYs for new brews though, as they probably won't work (something something chemistry). Or try it out and prove me wrong!

What if you want to take a break?

I took a break after my second batch, because even though I let that batch go 2 weeks on F1, I still had not finished my 9 bottles from my first batch! I really like tea, but tend to drink regular more and kombucha is more of a treat (or soda substitute). You might drink it faster, or have more people to help you, etc. Regardless, sometimes you may want to stop brewing, but you are probably wondering what to do with that SCOBY.

SCOBY Hotel (long term)

I moved my SCOBYs into a hotel. You can do this with any of your SCOBYs, from your first to your most recent. So I currently have 3 SCOBYs sitting in my hotel because I have the one my friend gave me, and I've brewed 2 batches which has resulted in 2 new SCOBYs. A hotel is basically a jar full of your SCOBY(s), some starter, and some sweet tea. The hotel can be covered with cloth or a more secure lid. Every 4-6 weeks you will want to decant some of the original liquid out and add new sweet tea to keep your SCOBYs fed.

I moved my 3 SCOBYs into a 1 quart mason jar with 2 cups starter and 2 cups fresh sweet tea (using 1 tea bag and 1 Tbsp organic cane sugar). I sealed it up and it sits in my basement until I am ready to brew more! This is also a good way to store your extra SCOBYs if you don't want to get rid of them some other way (there are some creative food/health uses, composting, give to a friend, or just throw it out).

I want to keep a few on hand in case I mess something up! It's a good idea to have some on hand as a backup, because your experiment can go wrong (for example, I want to try a black tea brew next time), or just the ferment can go wrong for unknown reasons. I do have easy access to replacements since I have a hook up from my friend, but not everyone will be in that situation. You can always buy a new one too, but my limited experience & research has shown that your brews will get better over time, so starting anew with a brand new SCOBY may take you back a step.

Just Let it Brew (short term)

Alternately, I've also read that if you are only planning to take a break for 4-6 weeks, you can just leave your brew going. Yeah, it's going to get really acidic and taste like vinegar, but the SCOBY should be fine. This will give you a really strong starter for your next time, or some people use the result as a vinegar in things like salad dressing, etc. You probably don't want to drink this though or bother with your F2 ;)

Friday, February 23, 2018

Homemade Gummy Bears

Sure you can replace toiletries and cleaning supplies, but what about all that processed food? I cook a lot from scratch, but I totally take the easy way out with snacks. Working from home has definitely given me the opportunity to try making more things from scratch though. We were playing games at a friend's house and she brought out fruit snacks. Because of my dairy allergy, I took a peek at the ingredients (they were safe, I thought they would be, but the things I have found dairy in would surprise you!). Did you know fruit snacks have wax in them??? I mean, beeswax won't exactly hurt you, but I don't necessarily plan to eat it.
So I set out to figure out how to make my own. No wax, no mystery allergens, plus I could pick my own flavors. The question is how hard and expensive would this get? Not very. The gelatin is not very expensive, and the liquid you use is so flexible that you can also keep that cost down too. The molds can be pricey, depending what shapes you want, but given that you will be reusing them the price is reasonable if this is something you plan to keep up with.

Homemade Gummy Snacks
1 cup fruit puree and/or liquid
(juice--commercial or fresh, tea, water, any combo thereof)
1-2 Tbsp honey, or to taste
(optional, but recommended if using a fresh fruit puree)
1 Tbsp lemon juice
(optional, but recommended if using a fresh fruit puree)
3 Tbsp gelatin OR 2 Tbsp agar agar*
1/4 - 1/2 tsp citric acid
(optional, for sour gummies)
Candy mold or shallow dish

To make, gently heat your liquid component. Again this can be a fruit or veggie puree, fresh or commercial juice, tea, water, or any combo thereof that totals 1 cup. If using flavored gelatin, you can even use plain water (for this option use 1 Tbsp flavored gelatin and 2 Tbsp unflavored). Slowly stir in your gelatin until dissolved, along with the remaining ingredients if using.

Honey may not be needed if using a commercial juice, so use your judgement. You can also sub with any sweetener of choice if desired. The lemon juice may add a little tang, but will mostly work to help preserve the fresh fruit or veggie purees. Citric acid has far more punch, so if your intent is a sour gummy use this instead, adjusting to taste.

Once everything has combined, pour into your molds. You could easily pour into a large pan and cut into small cubes once set, or you can buy a variety of cute molds** (fruit shapes, gummy bears, even dinosaurs!). After your liquid has been poured into its molds, let set in the refrigerator 1-2 hours or freezer 20-30 minutes. Pop out of your molds and store in an airtight container in the refrigerator for 2-3 weeks.
Tips & Tricks:
  • You may want to spray your molds with oil to help your gummies pop out after setting.
  • The texture is likely to be softer than you are used to. If you want harder/chewier gummies let them sit out on the counter or in the refrigerator uncovered 1-2 days to dehydrate a bit.
  • If your gummies stick together, toss them with a bit of cornstarch or arrowroot powder.
*What about vegan options? Gelatin is not vegan, but you could certainly use agar agar powder. I have not yet done this myself, but some research has suggested you may want to use only 2 Tbsp. If you choose to use agar agar, please comment and let me know how it worked and how much you used!

**Where do you get fruit snack or gummy bear molds? I found mine on Amazon, but a quick google search will show you all kinds of options.
You can really use any candy mold, or just pour into a large dish and cut into cubes once set. These are some of my favorite molds:

Gummysaurs 
(4 different dinos!)
Gummy Bears
Traditional Fruit Snacks

Perhaps a bit late for DIY Thursday, a bit early for Food & Fitness Monday, but there you have it!

Monday, August 19, 2013

Bento for Lunch

I guess I will follow the trend. I promise it's Random Monday, not Health Food Monday, but these just seem to be what I am thinking about lately. It's probably all this getting serious about being fit. Although...if this trend keeps up maybe I should dedicate a day to health & fitness. What do you think?

So...bento. What is it? In the simplest of terms, bento is a packed lunch. A bit more specifically, bento is a Japanese style of packed lunches. In Japan there are convenience store, or pre-packed, bento as well as homemade. Bento actually has a rather elaborate history, and today it is a rather common sight in the Japanese schools.
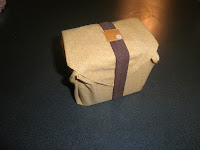
Bento wrapped in furoshiki
Bento in drawstring bag
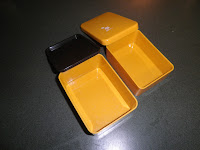
The reason I like bento so much (aside of my infatuation with the Japanese culture--blame that on my best friend in grade school having moved here from Japan and me being immersed in the culture at her house n_~), is the portion control. My favorite bento box is two tiers, measuring 3.3 inches l x 4.3 inches w x 3.5 inches h. I know this sounds very small, and indeed it looks very small, but you would be surprised how much food you can actually fit into it!
My favorite bento!
A better view of both tiers
The top tier of the bento holds 1 cup, and the bottom tier holds 1.5 cups. I find that either tier is plenty big enough to hold a decent sized side salad. I know it sounds and will look small, but if you were to take the salad out of the tier and put it onto a salad plate you would be quite pleased with the result. I often stick with the smaller tier and put salad dressing in a small 1 Tbsp container, which is just enough.
Salad in bento tier

Same salad on salad plate
(on top of dinner plate for reference)
The other tier is actually large enough to hold a small sandwich and a few grapes or cherries. You could also fit a wrap, an egg and veggies, humus with veggies and crackers, pasta, etc. The options are endless. And you don't have to stick with a salad. I've done a meat in the small tier with side veggies in the large tier (usually my packing of leftovers). You could also go a more traditional route in which the small tier holds rice and the large tier holds sides (stir fry, meat, veggies, eggs, etc).
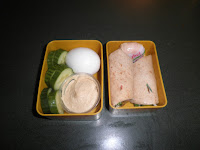
L: egg, cucumbers with hummus
R: wrap, and cheese wheel
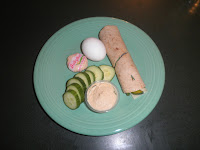
The same lunch on a dinner plate.
Perfect portion size :)
L: egg, strawberries, cheese & crackers
R: salad & dressing cup
L: pork & veggie stirfry
R: rice & soy sauce
Bento is just breaking into the non-western world, so sometimes it is hard to find "traditional" bento boxes. My favorite place to buy online is Bento USA. They have great prices and pretty fast shipping. You will also get an idea of the fun accessories that exist for bento (as moms may make character, picture, or other themed bento for their children--they get pretty elaborate!). Another good place to find some neat, although a bit pricey, bento is JBox.

If you are interested in bento, don't feel like you need to buy a special box! There are plenty of alternatives like your normal Tupperware. There is a really neat Tupperware like set that you may want to look into called Easy Lunch Boxes. It really doesn't matter what you use, and you don't have to make it cute. Just be aware of your portion sizes--smaller containers aid in this.

Another thing is variety. I've heard it said that Japanese mothers want their children's lunches to be colorful (no I don't know how accurate this is, sorry). This actually isn't a bad plan. Color means fruits and veggies, it means variety of foods, it means not everything is a starch. Variety, particularly of healthy options, is also another thing to be aware off. I find the smaller boxes help with this as well. You are trying to make your lunch colorful, so you don't pack as much of one thing (specifically starches & proteins).

Do you bento? What are your tips and tricks? Any favorite sellers, items, or accessories? What about food choices or recipes? Share them in the comments!

Monday, August 12, 2013

Cucumber Melon Smoothies

Yes, I have become slightly obsessed with smoothies. As I mentioned before, I am just not a breakfast person so these are a great compromise for me getting something in my stomach to kick start my metabolism first thing in the morning. Yes you can just search the internet, and I often do, but I like to record my favorites. I also see that a lot of recipes make large smoothies, and I am aiming at a 12-16 oz serving size. Plus I love stuff I can prep in advance to save time later (especially when I am still waking up!). Hopefully you find my sharing this with you helpful n_n

Shopping List:
1 honeydew melon
1 english cucumber
1 bunch mint
lime juice
honey
          Per packet:
1/2 c honeydew
1/4 c cucumber
6 mint leaves
1 Tbsp lime juice
1/2 Tbsp honey

This resulted in 8 packets. I split the cucumber and melon into eighths, but the amounts per packet were pretty spot on. The only thing I had leftovers of was the mint--I used a little over half. Depending on the size lime juice and honey you buy, you will probably have leftovers of these as well. I just used honey I had on hand, and bought one of those little bulb bottles of lime juice which didn't have much left when I was done.

Even though this is more of a delicately flavored smoothie, I included the flax and almond butter anyway. You could taste the almond butter, but it was subtle enough to not ruin the flavor of the smoothie. This is also probably one of the most refreshing smoothies I have made! It is great for sipping on while chilling on the porch on a warm summer day. I feel like this well become more of a snack than a breakfast for me n_~


I definitely prefer sandwich bags. My packets are at most 2 cups of fruit and greens, but I like the extra room because I can lay the bags flat and the fruits and greens can spread out and don't make huge clumps when they freeze (which works much better in the blender).

I have also found I need to upgrade blenders. I was using my mom's GE 12 oz single serving blender, but I find I need a little more room to get all the frozen fruit to blend nicely (I particularly had problems with the Tropical Green smoothie). So I have invested (kind of..it was only $14) in the Hamilton Beach single serve blender which holds about 16 oz and gives that extra room I need for blending.

Now that I've bombarded you with a month of smoothies, what are your favorites? Do you eat them for breakfast, snacks, or other meal replacements? What about those of you who are lactose-intolerant, gluten free, or vegan? Share your favorites and suggestions in the comments!

Monday, July 29, 2013

Tropical Green Smoothie

As much as I love my banana-[insert random berry(ies) here] smoothies, I thought I should start changing it up. Add a little variety to my mornings. So I am trying something new and adding another smoothie to the mix. My boyfriend's little sister had gotten something similar to this from Jamba Juice and let me try it. It was really yummy and the tropical fruits completely overpower the greens in flavor so you get the benefits of the greens without the taste. I've done a little searching on the web for similar recipes, and this is what I've come up with for a 12-16oz single serving smoothie.

Shopping List:
1 bunch spinach
1 bunch kale
1 pineapple
2 mangoes
4 bananas
          Per packet:
1/2 c spinach
1/2 c kale
1/4 c pineapple, chunked
1/4 c mango, chunked
1/2 banana, sliced

This resulted in 8 packets. The measurements I will say are approximations as I pretty much just split whatever I had into 8 packets--really I was fairly close to my measurements and I think I was only a little short on the greens, but I still managed to get a handful of each per packet.

Following suit of my last two smoothie posts, I make these lactose free and try to boost the protein. In doing so I add 4-6 oz unflavored soy milk (I find with the frozen fruit I need closer to 6 oz, whereas with fresh fruit I use 4 oz and about 1/2 c by volume of ice), 1 Tbsp plain creamy almond butter, 1 Tbsp ground flax seed/flax seed meal.


This time I used sandwich bags! You definitely need the extra space for the greens anyway, plus I'm hoping the fruit won't clump up into one giant frozen chunk like they did the with banana berry smoothies in the snack bags n_n (Ignore the fact that I folded them over for the pictures! >.< )

What are your favorite smoothie recipes? Are there any you are particularly fond of for meal replacements (e.g. breakfast)? Share them here!

Monday, July 22, 2013

Banana Berry Smoothie Packets

Breakfast smoothies have become my go to. They keep me nice and full until lunch, they are healthy, and they kick start my metabolism. As any nutritionist or trainer will tell you, breakfast is a very important meal. However, I am not a breakfast person at all so this is my compromise.

I shared some of my recipes a while back, comparing my lactose free protein shake with a commercial one. This is just how things have evolved since that post in my kitchen. What's great about preparing these packets is 1. you just have to mix with your base (in my case, soy milk, almond butter & flax seed, but you could do water, milk, even throw in some protein shake mix) and 2. you do not need to add ice! I have upgraded to ALL THE BERRIES, so that is the breakdown I will give you.

Shopping List:
1 pint strawberries
6 oz raspberries
6 oz blackberries
6 oz blueberries
4 bananas
          Per packet:
3 strawberries, quartered
7-10 raspberries
7-10 blackberries
10 blue berries
1/2 banana, sliced

In dividing up the strawberries, I had enough to make 7 packets. From there I split up the raspberries and blackberries until there were none left, so the number I give you is more of an approximation. The blueberries I did actually count out 10 per packet, and I had a handful of them left (although not for long, as my dog thinks they are delicious and ate them all...after of course rolling them around the kitchen floor and chasing them.) I also ended up with 1/2 banana left over, but depending on the size of your strawberries you may be able to get an 8th packet out of them.


I used snack sized ziploc bags for these. The fruit just barely fit into the bags. It was also 1 solid block of frozen fruit when I took it out to make my smoothie, so I had to break it up in order to get the blender to mix everything. I would have gone with sandwich bags, but I did not discover we were out until I was about to bag all my cut up fruit. In the future I will use them to avoid this ice chunk and recommend you do too n_n

Now to start exploring more smoothie options. I hear some good think about some mango or pineapple smoothie involving spinach and kale...wonder how well I can freeze up those packets?

Monday, June 17, 2013

Healthy Snacks

It's Random Monday again at my blog. I'll pick up from last week's entry and talk about my healthy snack options. I have been noticing that my morning smoothies are keeping me rather full until lunch, and my bento packing is doing a good job of tiding me over until dinner, or at least the end of the work day (I think I'll discuss bento next week n_n). But every now and then I get the munchies, and I try to deal with them in a healthy way.

Sometimes I'll pack little snack bentos. There is one style that is made to hold two onigiri (rice balls), so it is fairly small. I put a dip or cheese in the bottom section, which has a lid, and stuff the top section with fruit, veggies, or crackers. My typical go to is hummus with veggies or rice crackers, but I've been know to do veggies and dip, fruit and dip, cheese and crackers, even chips and salsa.

When I have a sweet craving, I may reach for a pudding or jello cup. At just about 100 calories* (80 jello, 110 pudding), they don't dig into my daily allotment too much and that takes care of that sugar craving. I also keep small pieces of dark chocolate (Hershey's Bliss or Dove) on hand, and one piece is usually enough to tide me over if I savor it instead of chewing. Plus at 35 and 40 calories respectively, I can afford to have 2 or 3 pieces if I want. I have also found the Weight Watchers Mint Cookie Crisps rather satisfying. They are about the size of a fun size candy bar, but they are very filling and taste just like Thin Mints. As a bonus, they are only 70 calories!

When it comes to other store bought snacks, I often grab rice crackers. Trader Joe's savory rice crackers are my favorite, but I found some sesame rice crackers at Fresh Market that were pretty comparable. The fulfill that salty craving and at just 3.5 calories a piece, you can eat quite a bit. I also like Sensible Portions' Cinnamon Apple Straws. They are all natural and 38 (or 1/6 the bag) is only 130 calories! The serving size is huge too--38 straws fills a cereal bowl, so I often eat half a serving or less as a snack.

I try to make my snacks whenever possible. I really want to learn to make hummus and rice crackers, but for now I settle for cookies (I know, not healthy but I don't make them often and only pack 2 as a snack), kale chips, and hard boiled eggs. I find with a little salt & pepper, the egg itself fills most cravings and is chock full of protein and usually tides me over (although they are now becoming a lunch staple for me). Kale chips have got to be the easiest thing in the world to make, and they are so tasty. The kale loses its bitterness when you bake it, and the seasoning choices are endless. My favorites are seasoned salt and garlic powder/salt/cracked black pepper. Here is a quick little recipe if you want to give it a try:

Kale Chips
1 bunch kale
1 Tbsp olive oil (approximately)
seasonings of your choice

Wash and dry the kale (a salad spinner is helpful here, or pat dry between paper towels). Trim the leaves from the bitter stem. Tear or cut kale into pieces (they will shrivel up, so I would say go at least 1.5 times larger than you want the chips).

Toss kale with olive oil--you want them coated with oil but not soaked.  I usually just throw it into a bowl and drizzle a little bit over the top the toss. If you have a spritzer, you could also lay them out first then spray the olive oil (I should try this--my mom has a few of these that are going unused...)

Lay the kale on a parchment lined baking sheet. Sometimes placing the curled side down helps with air circulation and to prevent sticking. Sprinkle with as much or as little seasoning as you want (just remember a little goes a long way). Bake at 350F (175C) for 12-15 minutes, or until edges just start to brown.

I just store these in a paper bag with the top folded over. They will stay good for at least a week, but to be honest I rarely have them go that long without being eaten n_n

What's even better about these as a snack, is that one batch is only about 175-200 calories (depending on the olive oil you use). I would say you end up with about half the volume you started with, so maybe 2-3 cups of chips. Although my sister and I ate a whole batch in one afternoon, they were so good! I felt guilty until I found out it was only 100 calories. You may find these hard to stop eating too. I recommend packing them up in baggies so that you can grab one each day during the week. They are also really easy and fast to make, so if you run out it is easy to replenish your stock.

*I am of the camp that the best "diet" is counting calories. It's all about what goes in and what goes out. Some days you may break your diet, and I agree that 1 free day a week is incredibly helpful, but counting calories allows me to be a little less restrictive than some of these other diet plans (e.g. low carb, no carb, low protein, high protein, paleo). I do on occasion refer to some of these diets for food ideas. For example I am really fond of the South beach Diet recipes.

I use My Fitness Pal to track my calories eaten and calories burned, and I will also use Map My Run if I am out about walking instead of in the gym. My username for both is caitinc, so feel free to add me if you want to get fit together n_n

Monday, June 10, 2013

Lactose Free Protein Shakes?

I've decided Mondays will be my random post of the week day. It might be shop related, or it could just be something I am personally interested in like today.

As you may have read a few weeks ago, I am trying to get back into shape. This is for both personal reasons as well as health (I've got enough things to worry about, I don't need to throw weight onto that list and possibly cause complications later on). I do like to eat healthy normally, so my main problem is exercise. To combat that I hit the gym every day on my lunch for 25 minutes on the elliptical. I need to get myself back into a routine, as my current fill-in position is spoiling me with really flexible hours, and then I will be taking my dog for a walk every day too. I'm hoping to fit in a DVD workout or yoga every night too, but let's not get ahead of ourselves.

Even though I like to eat healthy, I don't take the time to pack lunches and I often skip breakfast. Skipping breakfast is just a bad idea when it comes to keeping your metabolism in line, and not packing lunches means I'm getting a lot of fast food or prepared food (and lately, I have found myself preferring all-natural & organic options whenever possible).

To take care of the breakfast issue, I have started making smoothies. I am never very hungry in the morning, but I am always thirsty, so I found this a good compromise. I make myself a good smoothie and beef up the protein which keeps my fairly full until lunch so I am not snacking (whereas with just water, I would find myself nibbling on things around 10/11 am). Since I am lactose-intolerant, I do not use the protein shake powders and went to look for natural alternatives.

I opted for almond butter, ground flax seed, and soy milk in lieu of water and a protein shake powder. My three current flavors are strawberry banana, raspberry banana, and strawberry raspberry. My quick recipe for a 12 oz smoothie is as follows:

All Natural Fruit Smoothies
Fruit (choose 2 of the following: 1/2 banana, 3 strawberries, 6 raspberries)
1/2 c soy milk (regular, not vanilla)
1 Tbsp ground flax seed
1 Tbsp creamy almond butter
Ice (I use a single serve blender and fill it about 1/2-2/3 with ice)

Throw all ingredients in your blender, I recommend starting with the ice and ending with the soy milk, and blend until you are happy with the consistency. I do recommend cutting up the fruit (except the raspberries, they are pretty small already) and avoiding giant chunks of ice to get a smooth texture.

Below are the nutritional facts for each smoothie:
Strawberry Banana
249 calories
25 g carbohydrates
13 g fat
10 g protein
13g sugar
Raspberry Banana
237 calories
26 g carbohydrates
13 g fat
10 g protein
12 g sugar
Strawberry Raspberry
194 calories
10 g carbohydrates
13 g fat
9 g protein
5 g sugar

And here you can compare to the nutritional facts if you were to use 1 packet or scoop of a protein shake (HMR 800 Vanilla, in this instance as that is what my mom uses) and water instead of the soy milk, flax seed, and almond butter:
Strawberry Banana
249 calories
38 g carbohydrates
2 g fat
17 g protein
52 g sugar
Raspberry Banana
237 calories
39 g carbohydrates
2 g fat
17 g protein
30 g sugar
Strawberry Raspberry
194 calories
23 g carbohydrates
2 g fat
16 g protein
44 g sugar

Calorie-wise, both methods are the same. My method gives you about half the protein (but considering the only protein you gain from the fruit is 1 g from the banana, I consider the 9 g decent), but also less sugar and carbohydrates. My method does have more fat, but at least it is the good kind of fat that you get from nuts.

This has started becoming my breakfast. Since adding the flax and almond butter, I have noticed they are much more filling. Also these additions didn't really alter the taste too much. On the days where I am extra hungry though, I'll reach for single servings of granola (bar or loose), instant oatmeal, or instant cream of wheat (I prefer Farina). I've also lately become enamored with Emerald Nut's Breakfast on the Go! The breakfast nut blend with glazed walnuts is my current favorite, and at only 180 calories, my breakfast is still kept reasonable.

Next time, I'll go into what I do for healthy snacks to tide me over during the day. And possibly in the future I'll discuss how bento boxes help me pack appropriate portion sizes for lunch and keep me feeling full until dinner. I can't guarantee these will be the next two Monday posts, as other more interesting things may pop up, but they will be forthcoming.

Wednesday's post will focus on how I size infant footwear, and I may possibly go into the roller skate booties and what makes them unique (or that may be next week's post if it seems like too much info for one).

Friday's post is still a mystery! I converted a neat knitting pattern to crochet, and if I can get permission from the author I will be sharing both versions. Otherwise I have a video game character that may get typed up if I can find my original notes this week.