Showing posts with label crochet. Show all posts

Friday, June 20, 2014

Free Pattern Friday: Monsters Inc.

I had intended to make a nice write-up of the minion pattern for FPF, but I have not done so yet. However, in the same spirit of Disney/Pixar I happened to run across these cuties. The pattern is free, and the designer is pretty awesome and has ok-ed sale of items made using her patterns (with recognition, of course!). So I am sharing with you Josephine Wu's, from A Morning Cup of Jo Creations, baby Mike & Scully from Monsters Inc. (ravelry link):
(c) Josephine Wu

I have yet to make these little guys, but they are oh-so-cute! One day I will make them for myself. If you read my last post, you know a bit of the issues with using another's pattern (which luckily, again, Jo is very cool about), and with selling licensed character plush (even if handmade). As such, they will probably never be regular shop items, but I would certainly make them by request! Or if you are a crocheter, make your own since the pattern is free and they are adorable n_n

Check out Jo's other patterns too. She's got a bunch of adorable chibi-style plush, all under $5 or free.

Monday, April 7, 2014

New Products!

Ok--so I'm a little late on the updates. I am sure most of you have already seen them on my Facebook page, but let's get the bog moving again with some new release highlights and some talk about what is to come.

Last week I released a new toy set and outfit, as well as updated an existing toy set. Let's start with what is new n_n

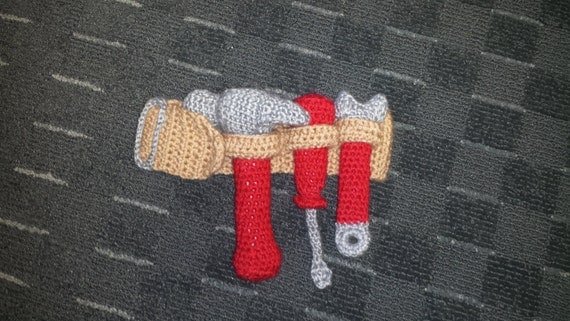
Tool Belt Toy Set
This little set is currently a favorite of mine. I designed it for a local ministry to use as a door prize, as after one of the members saw my purse set (she is also friends with the mama) I was asked to make one for them to raffle and a boy set of some sort. So here you have the tool belt:
Toolbelt Toy Set
The hammer, screwdriver, and wrench are plush but can be turned into rattles via an add-on listing in my shop (however, I feel the hammer would be best suiting for this as the wrench is very flat so the rattle piece would be noticeably felt, and the screwdriver does not have much room for a rattle piece, but it would fit in there without being as noticeable as the wrench). The listing includes the belt, and the pouch is available as an add-on for a small additional fee. Originally I wanted to include the pouch in the listing, but I was already looking at a higher price without it just due to the extra materials.
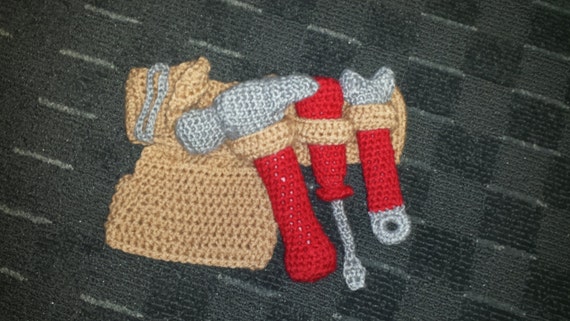
Toolbelt with Pouch
This listing does have some costumization as well (I love to give you guys options!). There are 6 colors for the tool handles (Red, Royal Blue, Dark Green, Yellow, Neon Orange, Black) and 3 colors for the belt/pouch (Tan, Brown, Gold). I do not list sizes, but the default belt length is 23.5 inches which will easily accommodate up to a 22 inch waist. This measurement is laid flat and the belt is rather stretchy so can accommodate a slightly larger waist, and it is adjustable so will definitely accommodate smaller waists. If you want it shorter or longer please just add a note on your purchase.

This was a huge hit locally and already has an order! Turn around time is 3-5 days for crafting, plus an additional day or 2 to get your item packed and shipped.

Construction Outfit
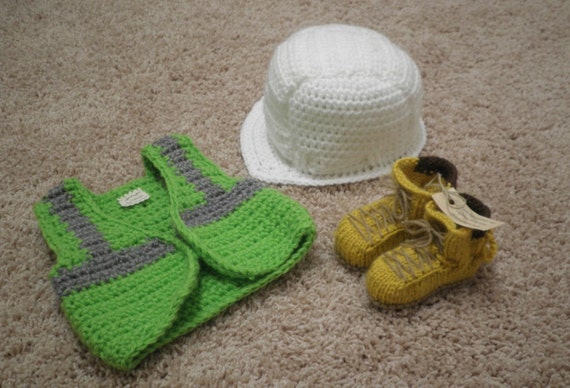
I know I mentioned this last year when the custom Nicor Reader Outfit was posted, but the construction outfit is finally available! I had to do a little research as designed the hat and had trouble scaling it to other sizes, and the free vest pattern I used was one size only. Now that I have found patterns that I can use for shop items, the outfit is ready for sale:
Construction Set
This set includes a hard hat, safety vest, and work boots. You will notice 4 sizes are listed, but only the work boots actually have 4 sizes, while the others have 3. The hat and vest patterns only had sizes 0-6 months, 6-12 months, and toddler while my booties size differently as I actually did scale that pattern after creating it. This just means you have some additional size options for the booties, and the corresponding hat/vest will be made as well. So, your size options are:
3-6 months (3-6m boots, 0-6m hat, 0-6 m vest)
6-9 months (6-9 boots, 6-12m hat, 6-12m vest)
9-12 months (9-12m boots, 6-12m hat, 6-12m vest)
12-18 months (12-18m boots, 12-18m hats, 12-18m vest)

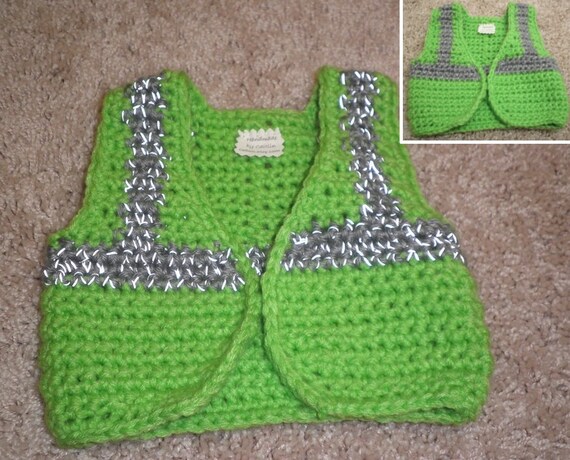
And again there are customization options. One day I hope to have the free time to make samples of all my listings in their available made-to-order options (and of course I always accept custom requests for different color options/combos!), but in the mean time there are swatches of the colors. The hat has 3 colors (White, Construction Yellow, Construction Orange), and the vest has 3 colors (Neon Yellow, Neon Orange, Neon Green). The boots are currently only available in standard work boot gold. There is also an optional add-on for reflective stripes on your safety vest. Do keep in mind the reflective thread is not very elastic though, so if you are on the cusp of 2 sizes order a size up.
Reflective Safety Vest
Turn around time for this order is 5-7 days. Adding reflective thread does not affect the crafting time.

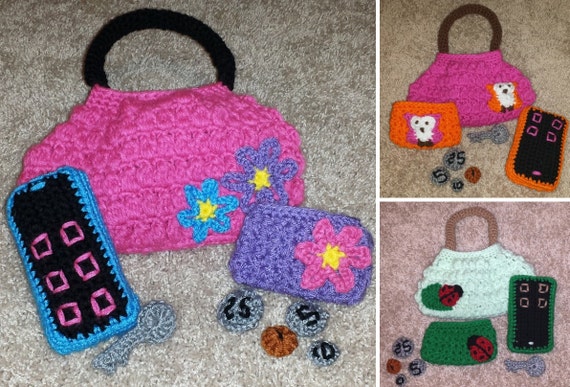
Purse Toy Set
I will not go into great detail about this, as it has been covered previously. The purse toy set includes a purse, wallet, and stuffed cell phone (rattle option available). The inclusion of the key and coins have been made optional as they are rather small and could be a choking hazard if this gift is for an infant instead of a toddler. There are 3 specific designs available for sale, and a made-to-order listing which lets you choose your design and colors (colors are to be added in the notes to seller section of your order, as there are too many variables to list in a drop down; color swatches are provided in the listing).
Purse Toy Set
There are also a few listings coming up for adults. Currently one purse and wallet only set is listed for purchase as the purse is a good size for a clutch and the wallet holds cards perfectly. Eventually they will be listed as individual products as well...keep your eyes peeled!

Coming Soon
I have 3 friends expecting, 1 coworker expecting, 1 friend trying, and another friend with a little boy turning one! That means lots of planning, designing, etc. That also means possible future products for you!

The toolbelt has inspired me to make a Tool Box! The same tools will be included, but they will be housed in an old-fashioned tool box. I have some sketches down, but I have not quite figured out construction. I want this to be stable which may include support structures or extra yarn. Unfortunately this will affect price and the tool box is likely to be more expensive than the tool belt but I am hoping to keep it in the $30-35 price range n_n

I also am designing a Letterman Jacket as one of my gifts. It will be super cute and I can't wait to finish it. This will definitely be available in the shop, with either color combo or school color choices and multiple sizes. The one I am making for my friend will have his initial...I am not sure how to handle that in my listing (we are only allowed 2 variables in etsy), so they may be preset to the school, or I will ask you to request a letter in the Notes to Seller (this way you can do a school letter or initial).

I am also looking into Blankets and Caps for order. Sometimes it can be daunting to come up with a design on your own or make a custom request without an image to go with it. Since I will be making a good amount of blankets coming up, I am thinking of making a few listings of different stitch patterns with the colors and border style as your options. Likewise, a cap listing with color and size choices would be added. What do you think?

Ideas
My friends are awesome. Seriously. They also help me come up with cool ideas. Not too long ago a few suggested super hero chucks, using the hero logo in place of the star patch. So that is definitely something I am playing with, as well as how to translate the idea over to super hero mary janes. I am thinking either clay or painted buttons to go at the end of the straps, similar to how I've used small flowers on some pairs.

Building off the construction set, last week my buddy and I came up with a few ways to adapt it to multiple themes. He came up with the idea of a hunting set, consisting of a camo billed cap, neon orange vest, and the boots. He also suggested a biker set with a black helmet, vest (jean or black, possibly with patches), and black combat boots. Taking that a step father I was thinking cowboy/rancher set consisting of a cowboy hat, plaid/denim vest, and boots (either work boots or cowboy boots).

With the bridal mittens in the works, I am always thinking of more items for the teens and adults. Even though it is finally getting warm in the states, I am thinking of some fingerless gloves. They are always great year round, especially for office workers or people living farther north.

Do you have any ideas or requests? If so, post them here! Or on Facebook, or convo me on etsy n_n

Wednesday, February 26, 2014

Gift Reveal and New Shop Item

My day job just keeps getting crazier! If you saw me at work, you would not believe my title is "Receptionist" lol. Between work and school there has been very little time for samples, and the orders I am getting are keeping me pretty busy n_n

I know I still owe you guys some pictures of old custom orders. As they were local orders, they were handled in person and never posted to etsy. Once I figure out where I put the camera with those pictures on it, I will post them here and on Facebook for you to see!

Last week, I was working on a gift set for my friend's two year old daughter. She loves bags and will abscond with yours if not watched. She usually doesn't take them apart, but just carries them around very happily. Last night she was adorable with a bag that she kept "hiding" behind her back, despite it being larger than she!

So, back to the point, I made her a small purse complete with stuffed cell phone, coin purse/wallet (with coins!), and a key:


This gift set will be posted for sale in the shop shortly. I may make up some samples and post those for sale, and there will definitely be a made-to-order listing. As I currently do not have samples, the made-to-order listing will have swatches for you to choose colors from. I will likely include a list of adornments as well (so you are not stuck with flowers, but also to insure adornments that would not look good aren't picked). And, as always, you can contact me for custom orders to meet your specific desires.

I was also playing around with the idea of making the phone capable of ringing, etc. Unfortunately I did not have the custom sound buttons on hand like I had thought, so that did not come to fruition for the gift. However, if I can find a decent priced supply, they may be available as an add-on for a small additional fee in the shop!

I was inspired by some various patterns and projects, but ultimately I created the patterns for these items on my own. As such, I cannot point you in the right direction to craft your own, but should there be enough interest I may list the pattern for sale as well n_n

I am trying to get back to my regular schedule of posts, and possibly add to it as I am getting into other all natural and DIY facets that would fit in with my "usual" posts. Until then I am going to try to post at least once per week.

Thanks for stopping by! Keep an eye on my Facebook and Twitter to see when this toy set is listed for sale. 

Friday, October 11, 2013

Free Pattern Friday: Katamari Edition

Last year I made my 19 year old brother a Katamari set for his birthday. Lucky for me, my brother is awesome and totally appreciates hand crafted items. Now he is picky, so I only make things he specifically asks for (or otherwise obviously implies) he wants. I had shown him the magnetic Katamari ball, because this is one of his favorite games, and he thought it was very cool and practically demanded one. The Prince not so much, but he's like me in some regards so I knew he would appreciate the set (and he did! They now have pride of place on his speakers).

Now the patterns came from two different sources, so you get a twofer today n_~

Amy Shimel's Magnetic Katamari pattern is posted on her blog and very easy to follow. You only need to know single crochet and increases (and how to start working in the round, Amy recommends the magic circle), as the ball itself is made in two halves.

She does recommend a certain type of magnet (Darice 3/4" which come in a pack of 8 for $2.50, but you will need 28 magnets so that is 4 packs). This is because she had come across other magnets for better prices (50 for $5), but they were not strong enough. Now I couldn't find the Darice magnets, and Hobby Lobby is the most convenient craft store for me to get to (it's just 2 blocks away from my work...also I am lazy and don't like to drive out to Michael's or JoAnn's unless I have another purpose). They carry a generic (Tree House Studio) brand of ceramic magnets with a magnet strength of 6, and they worked just fine. You can get 8 for $2.50 or 50 for $7.99, so this is another option for you or just some info on the kind of magnet that works.

Check out Amy's pattern and make your own magnetic Katamari. Then have tons of fun playing with it!

Keiko Kikuno's Katamari Damacy Prince pattern is also free. I found it on Ravelry, but it is hosted on Google Docs so anyone can access it. I found it pretty easy to follow and only changed one thing. Most amigurumi worked in rounds is worked in spirals, which is fine for solid colors, but color changes can lead to not quite perfect shapes. In the pattern the face is worked into the head, so the peach patch becomes more of a rhombus. The edging can probably correct this, but I opted to make the head solid green and make a flat rectangular patch to sew on for the face (12 stitches by 12 rows).

Check out the patterns, and the games! They are generally goofy, but a lot of fun (for beginner and advanced gamers). If you make your own toys, please share and make sure to tell the designers you liked their work!

Friday, October 4, 2013

Free Pattern: Fierce but Friendly Dragon

This week's free pattern is a bit more advanced, but still adorable. Last year I participated in a Harry Potter swap (Ravelry is full of swaps, and if you are a member I highly recommend the Odd Duck Swaps group...3 new themes every month and they are very good about making sure everyone gets their package). Anyway, I made this little guy as part of the swap, because dragons.
Now this pattern does assume you have a decent knowledge of and comfort level with crochet, so unfortunately I would not recommend this for a beginner. However, I would not say it is overly advanced either.

The pattern is LucyRavenscar's Fierce Little Dragon. This link is to an updated version made available as a free Ravelry download. It is well written and formatted (printer friendly!), and I found it rather easy to follow. If you are not on Ravelry, you can get the original version of her pattern as well, but it is not as clear or easy to follow.

Friday, September 27, 2013

Free Pattern: Amigurumi Cupcake Tutorial

This is the tutorial I used to ease my way back into crochet after 10+ years of having not done it. My grandma taught me way back when, I want to say I was 8. I kept it up for a little bit, but we moved when I was 10 and I hadn't touched any yarn craft until I was in my early 20s (I believe I was 21 or 22). I started up again with knitting, but wanted to get back into crochet as well. I kept having this problem of my work getting narrower as I went (a problem simply solved by remembering to chain at the start of every new row lol). This tutorial was appealing because 1) it is worked in a spiral, so no starting new rows! and 2) I always wanted to get into crochet plush.

Ignore the awesome quality of a webcam photo n_~
I sent him to my grandma and never got better pics
This pattern was very easy to follow and a great use for scrap yarn. The only stitches you need to know are chain, single crochet, and increase (Knit Simple has a great illustrated guide to crochet). You also need to know decrease if you make the cherry, but I opted not.

The only tricky part might be learning the magic circle technique, although nimoe links to my favorite tutorial for it. If you find that technique a bit daunting, you can just chain 2 and work all your round 1 single crochets into the second chain. It's the same effect, there is just a possibility of  small hole using the chain method versus the magic circle method which allows you to cinch that hole closed.

If you want to make this guy, or just take your first venture into the world of amigurumi, I highly recommend nimoe's Amigurumi Cupcake Tutorial. She takes you through step by step with clear instructions and lots of pictures. She even shows you how to weave in your ends, do a simple straight stitch embroidery, and seam the top and bottom together.

For those of you who don't need a tutorial but still want the pattern without all that extra fluff, here is a version nimoe has of the pattern only.


Friday, September 20, 2013

Owl let you in on this little secret...

Amigurumi is the art of making crochet plush. However, not all these plush need to be made of many parts, involve complicated instructions, or even take a long time! Brigitte Read's Owlettes are one such pattern. They are stated to only take and hour and a small amount of scrap yarn (plus some stuffing and eyes). And they are darned cute to boot.
(c) romansock
I have not made one of these little guys yet, but I do plan to soon. One thing I will note, having looked over the pattern, the designer does assume you have a basic understanding of crochet. This is a very simple project, an would not be bad for beginners, but you will need to look up a few other things.

To give you a hand, I decided to summarize here. Click on each term for a link to illustrated instructions.

DEFINITIONS
Slip Knot: Basically an adjustable loop made to slip over your crochet hook
Chain: Wrap the yarn around your hook (yo), and pull this through the loop on your hook
Single Crochet (sc): The most basic of crochet stitches, made but pushing your hook through a space/stitch on the previous row, doing a yo and pulling it through the space you put your hook into (giving you 2 loops on the hook), then doing another yo and pulling the yarn through the 2 loops on your hook
Increase (inc): This is done by working 2 sc into the same space/stitch on the previous row/round
Decrease (dec): This is done by working 1 sc until the final [yo, pull through 2 loops]. At this point you will begin the next sc, stopping at the same point. Now you will yo and pull the yarn through all 3 loops on the hook. One decrease stitch is worked into two stitches of the previous row/round.

TECHNIQUES
Working in a circle: For this pattern, we are working in a spiral, which means you just keep going (no joining, chaining, or turning). Essentially, each round you are increasing by the number of stitches you originally started with. In this pattern you start with 6 sc, so each round you will increase by 6. The way to do this evenly is be evenly spacing the increase, for example:
Round 1: 6 sc..................................................6 stitches
Round 2: (inc) 6 times....................................12 stitches
Round 3: (1 sc, inc in next stitch) 6 times........18 stitches
Round 4: (2 sc, inc in next stitch) 6 times........24 stitches
etc.
When it comes time to decrease for the top, you will work in the same way but in reverse until you end by decreasing 6 times.

Making the body as tall as it is wide: You can do this by measuring, of course. Another option is keeping track of how many rounds you worked making the bottom, then multiplying that by 2. So for example, if you started with your 6 sc and increased for 4 rounds, that's a total of 5 rounds. Multiply that by 2 to get 10; this is how many rounds you want to work until you start to decrease.

Decrease by skipping the ch 1: The owl's body is worked in rounds instead of rows. Usually rounds are worked as spiral to make the crochet look seamless, however flat crochet is worked in rows. At the end of a row you must turn your work and go back the other direction, but when you do this you also ch 1 in order to bring the yarn above the previous row so that you can start a new one. When you do this, you would decrease as described above. However, if you skip the ch 1 when working flat you are forced to skip the first stitch after you turn your work

NOTES
The directions say to begin by chaining 2, then crocheting 6 into the 2nd chain. An alternate option, one which I prefer, is crocheting 6 sc into a magic circle. I like this technique because it eliminates holes, which can sometimes occur when working a large amount of stitches into one chain to create a ring.

Magic Circle: a technique where you create a ring with your yarn tail, and work your stitches into it. This allows you to pull the yarn tail to cinch up the center of your circle.

Friday, August 30, 2013

Free Flower Fairy Pattern

This week I am going to share a pattern by one of my favorite amigurumi designers, Mia Zamora-Johnson. She's got a few free patterns, but it is rare that one is a doll she has designed. Mia's dolls are some of the cutest I've seen. Anne Geddes fans will love them! She's got regular dolls, character dolls, dolls dressed as fruit/veggies, dolls dressed as flowers, and dolls dressed as animals.

This week's pattern is for a flower fairy, and she is so cute! Mia's instructions are always very clear and easy to follow. She even gives you tips on how to embroider the hair, which is very helpful and not all that common. I haven't made a flower fairy yet, but below is a picture from the pattern.
Pattern (c) Mia Zamora-Johnson
Photo (c) Brandy Fortune
Get the free pattern here.

Friday, July 26, 2013

Free Keroppi Pattern

In honor of my sister moving to Japan tomorrow, I thought we could look at a pattern in theme n_n

I am sure many of you are familiar with SanRio, or if not at least Hello Kitty. There are many other characters that SanRio has created, my favorite of all time being the frog Keroppi. My best friend in grade school and middle school was Japanese and had actually moved here when we were in kindergarten. As a 6 year old I was engulfed in her culture and the adorable world of SanRio.


A while back I went on a hunt for a Keroppi plush pattern, and I think I found the perfect one over at Stitch Love. Michelle's Keroppi is not only perfect looking, her pattern is easy to follow and it's free!

A mini Keroppi I made as a keychain.

Check out the pattern here and make your own Keroppi n_n


Sorry for the short post and lack of Product Info Wednesday this week. As I said, my sister is moving to Japan tomorrow! On top of that my boyfriend's brother is getting married today so I have been crazy busy all week and will probably continue to be so through the weekend! Things should slow down and be back to normal next week with a few custom orders on the hooks & needles and our regularly scheduled posts.

Friday, July 19, 2013

Free Beginner Crochet Blanket Pattern

Welcome again to Free Pattern Fridays. This week's installment is not one of my patterns (they seem to have been misplaced in the midst of redoing my computer a few months back, but don't worry I will  find them eventually!). However, I really like this blanket and believe it is pretty simple. In fact this is the pattern I used to teach my friend how to crochet. You learn some basics: chain, double crochet, increase, and decrease. The ripples give it a nice "advanced" look which is what my friend liked. She didn't want some "crappy" first project, so instead she got a beautiful wavey blanket in aqua, brown, white, and tan (I wish I had a picture, because the color combo is just gorgeous!). I unfortunately have only ever finished a dolly blanket in this pattern, although I do have a few inches of an afghan for myself started (It will be in black, burgundy, dark teal, and aqua).

So without further ado, I give you Susan B.'s Easy Ripple Afghan (click the picture for the link):

(c) Susan B in metro KC


Friday, July 12, 2013

Free Zero the Dog Pattern at Jellybums

Well boys and girls, I have yet to hear back from the author about sharing my crochet adaptation of her knitting pattern for Zero. Although, in all honestly, I pretty much followed the pattern exactly as it was written and just changed each knit or purl stitch into a single crochet. So, if you crochet instead of knit, just work each stitch as a single crochet with a US D hook :)


I made my crochet Zero* as a prototype for converting Jellybum's pattern from knit as my swap partner had wanted to learn amigurumi and I thought this would be a pretty simple pattern and a great addition to her Tim Burton swap* packaged. It is a very easy to follow pattern, and I recommend checking out Jellybum's other patterns on her blog and in her etsy shop.

So, without further ado, here is Jellybum's Zero the Ghostly Dog pattern. Enjoy!


*links to my Ravelry project pages--must have an account to view

Saturday, June 15, 2013

Free Pattern Friday, Late Edition

Sorry to make you wait. The pattern I originally wanted to post is a crochet adaptation of a free knitting pattern for Zero (I thought I'd keep in theme from last week), but I wanted to get permission from the original designer first. My back-up plan was to share my crochet mini Murloc pattern, but I cannot find my notes anywhere ;_; Unfortunately I gave him away too...Someday I will find my notes or recreate him, but there definitely was not time for this week.

So instead, I am cleaning up and sharing my D4 dice bag pattern this week. I figure it is appropriate since my group and I are playing tomorrow n_n This bag looks small, and it is, but it holds 3 complete dice sets plus 3 D6s (so thats a total of 24 regular dice plus some wiggle room). I have also stuffed my giant glowing crit die from Think Geek in there on occasion too, but that will completely fill the bag.

My dice bag along with all my dice that fit in it perfectly.
You could alternately close it up and stuff it for a geeky plush. I have plans of doing this for a complete dice set in the future n_n

So without further ado, here is my D4 dice bag pattern. Enjoy!