Showing posts with label product info. Show all posts

Wednesday, July 8, 2015

Reblog: Knitting Needle Material Affects Gauge

It's been...well, about half a year. So let's get back into it? I am still designing but between work and school (both full time) it is slooooooooow going. However, I ran across this post on my news feed via Knitty and found it a very interesting and educational read. Plus it is pretty good timing for the Shop/Product Info Wednesday post n_n

(c) Knit Darling
It does make me wonder what the reasons behind this difference are...

Circumference-wise, I feel like it may be the amount of traction (is that the right word? I feel like I am looking for a different word...). Anyway, I have not worked with carbon needles, but I can say from my experience that I prefer wood because metal is very slippery and plastic/resin is very sticky. In terms of stitch size, metal allows me to knit tightly because the stitches won't still on the needle and the tips are pointier allowing me to more easily work into a tight stitch. Also, the yarn slides more on the metal which inadvertently leads to me pulling the stitches tighter. Plastic is the opposite, especially when working with acrylic or man-made yarns. My stitches stick slide less and the tips are rounder, causing me to work a looser gauge, Wood/Bamboo is my material of choice because it isn't as slipper as metal, but they are sanded and polished to give more glide than plastic. Also, the tips are just pointy enough to work into the rogue tight stitch if necessary.

Length-wise, I do not have such a finite theory. Personally, I understand the material affecting stitch size as described on my personal experience above, but I would think that relates to overall stitch size not just width? Needles of the same size should have almost the same circumference (allowing for manufacturing variances), which would result in the same height? The only thing I can think of is that for my tighter stitches may lead to more pull on the yarn/stitch which would elongate it. Carbon excluded, it follows that the wider the stitch is, the shorter it is which kind of coincides with this idea...

She does not go over crochet hooks, so I would be interested to see a similar experiment with them. Regardless, it is a good reminder to always gauge both with the exact needle you will be using as well as in the same method technique (flat/round, etc).

So what do you think? Do you have any experience or theories to add to the discussion?

Wednesday, November 5, 2014

Shaping Your Knitwear, part 1: Stretching

Sometimes you have a knit or crochet item that is just a tad too small or too tight. It can be very disappointing when that happens, but you can usually stretch out your item just a bit. This doesn't work for items that are multiple sizes too small, but if you just need a little bit of wiggle room these tips can help.

First, there are a few things to consider when attempting to stretch your knit:

Fiber Type
Different fibers have different elasticity. Natural animal fibers like wool will offer the most stretch. Artificial fibers like acrylic (plastic) and metallic yarns will be significantly less giving. Even though cotton is a natural fiber, it has even less give than artificial yarns. You might be able to get a little stretch, but if you are looking for more it may not be possible.

Fabric/Stitch Type
By nature knit items will have more give than crochet. This is because the knit stitch is more like a weave, and the crochet stitch is more like knots. That being said, crochet items can certainly be stretched, especially if made out of a more pliable fiber. Just keep this in mind if you are looking for more than a little wiggle room.

The stitch type also impacts how much you will be able to stretch your item. Straight crochet or knt can be fairly stretchy, depending on the fiber. Ribbing, while used to gather fabric together, is designed with elasticity in mind. You will be able to stretch ribbing, but sacrifice it's gathering properties in exchange. Cables are created by twisting the fabric, so the give when stretching cables will be minimal. Fair Isle (color work) involves carrying all the colors across the work, which creates a rather tight stitch. Fair Isle pieces will have very little stretch.

Felted items will not stretch. They have been intentionally shrunk, and it is generally irreversible. If you now the item was originally knit (and not crochet), you may be able to get a little stretch. This would not be enough to go up a size, but could work for something that is just a tad too tight.


With those considerations out of the way, the rest is rather simple:

Stretching Process

  1. Soak the item in warm water, with a mild detergent (e.g. baby shampoo or wool wash). Be careful not to use hot water or agitate, especially if your item is wool as you risk felting or shrinkage.
  2. Rinse your item in warm water, again being careful to no use hot water or agitate.
  3. Place the item between some towels and press to dry. You could also slowly roll up the towels to squeeze out excess water. Do not ring or twists.
  4. Stretch out your item to desired size, or as far as fabric will let you go. Go slow and easy. Pay attention--you will feel when you are stretching too far, and if you continue to stretch you could break the yarn. If you have a form to stretch your item over, that is good idea and will help retain a good shape.
  5. Allow to air dry completely. Put in a place with good air flow to prevent mold or mildew. Avoid using hot air like from a hair dryer, but a fan may speed up the drying process.


Please pay attention to your item when attempting to stretch it. As noted above, some fabrics and stitches just do not lend themselves to stretching. Go slow and easy. If you feel too much resistance, stop or you risk breaking the yarn which can lead to unraveling. Be careful not to use hot water, agitation, or hot air as these are often used to create the opposite results.

As always, if you have questions or tips, please leave them in the comments!

Stay tuned for my next product info update which will go over shrinking your items! Sometime int eh near future, I will also give a more detailed break down of blocking your items into shape.

Friday, August 8, 2014

Playing Catch Up

The shop is back open! I had it on "Vacation Mode" for the last few weeks to catch up on some big projects, and once those were done I was getting ready to move. I was sad to do it, but you guys have been keeping me pretty busy with a steady stream of orders which I LOVE  but I was in need of some extra time. I'm all caught up and unpacked now though, so let the orders roll in again n_n

I've been posting the projects that have been occupying me on Facebook as they've been completed, but here is a quick collection of what has been going on the past few weeks...

Patchwork Puppy & Matching Blankie
I made this as a gift set for a friend of mine. She let me know the colors and theme (puppies & kitties), but also hinted that she loved the turtles I have made. I had to find a way to make it work, so using two Heidi Bears patterns, I compiled this little fella.
Heidi is pretty awesome and is cool with selling items made using her patters, so if you are interested convo me on etsy. However, these guys will not be regularly posted as they take quite a while and a good amount of yarn. This also means they will cost a bit more (like $30-35 for larger guys like this, probably).

Giraffe & Matching Blanket
This set was made for another friend (2 down, 3 more to go... this year!). It came about because they are keeping the gender a surprise. I was trying to figure out gender neutral combos, and thought these colors looked cute together and lent themselves well to a giraffe. This couple actually has another little gift on the way in the form of Jayne Cobb hats n_n

Nightmare Before Christmas Set
This set was so much fun! It was actually a commission, requested by my friend's husband for a coworker (the same one who requested the Nicor set...I love his requests! They are so much fun n_n). He wasn't sure what he wanted exactly, but his coworker loves The Nightmare Before Christmas. He got as far as booties, and something with Jack's face. This was the result and I am loving it.
This set may not be a regularly posted item, but if you are interested I am taking custom requests for it and/or individual items. Zero is actually a lovey/blankie buddy so his body is larger than normal and his collar is incorporated into the blanket part.

Wedding Mittens
These guys are more complicated to work on at work than I thought, so they took quite a bit longer. However they are now complete and below are the two different styles of pairs that were requested


*The two blankets in these pictures will be some of the pattern options available to you when I get the create your own blanket postings made. Until then, if you like the designs and are looking for a blanket, feel free to request one in the colors you want.

Wednesday, June 18, 2014

Selling Items from Patterns

This is a highly debated issue, and sometimes causes complications with requests I get for specific items, especially if the requester has found a pattern by someone else that they want me to use. I thought now would be a good time to address the situation and give you some basic information.

The Short Answer
Yes. Practically any pattern you want me to make an item from can legally be made and sold in public.

The Nitty-Gritty
According to what I have been able to find, patterns are rarely copyrighted (meaning that the designer has actually filed with the patent office). Even if a designer has gone this far, copyright law only protects the pattern itself, which means I/you cannot redistribute/resell the pattern, with or without alterations. You also should not be claiming the pattern/design of said resulting items as your own. However, this all only applies to the written instructions and not the items resulting from following the pattern. All items made using a pattern are not protected by copyright law. As such, you can't really be banned from selling items made using another person's pattern, nor are you liable to pay a fee to the designer for permission to sell these items. This also means those blanket statements and cottage licenses have no/little legal standing.

Yarn Obsession has a great summary of the circumstances, and even highlights some personal experiences related to the issue. Tabbers Temptations, also linked in the previous post, goes even further to break down the actual copyright law and explain how it really applies, citing court decisions and even highlighting false statements found on the web.

All that being said, you can't tell who has gone through the legal hoops to get specific protection, and as noted in an article I found in Vogue Knitting called Ask a Lawyer! Knitting and Copyright, and Knitty's Copyright Primer, it is wise to err on the side of caution. A designer may not be diligently policing, or they may; they may not be very litigious, or they could try to sue you (even if the ground they are standing on is very shakey or has no precedent...but do you have the spare money for lawyer fees just to find that out?)

My Answer
While it is completely legal for me to make an item from any pattern you find and sell it to you, both privately and publicly on etsy, I try very hard to adhere to the designer's wishes. Items I list on my shop that are designed by others almost always have a note from the designer saying they are OK with sale of items based off their patterns. This is more out of respect, but I try to follow it none-the-less.

On occasion I may make an item by custom request (meaning one time) that does not have such a note from the designer. In the event that the designer has specifically prohibited sale of items made using their patterns (despite the fact that there is no legal standing for such a statement), I will try to find an alternate pattern or design my own. If that is not possible, I may consider making the item but only for private sale (meaning we will make alternate arrangements off etsy), because despite the fact that it is completely legal for me to do so, I do not want to deal with the hassle and headache that may arise from going against a pattern designer's wishes.

As for the flip side, I do explicitly state on this website that is is legal to make items from my patterns and sell them. I am in like mind Fresh Stitches in that it is more beneficial to me and you to state this out right. You use my patterns, other people see that you've used my patterns, and hopefully I get more sales or custom item requests. Handmade by Caitlin is a side job, so while I would love to make a profit crafting an item for you, I will not be upset to have some extra time to myself while someone who has bought my pattern makes the item for you instead. I do ask that you link back to me, and I do include a note that I would prefer you not selling items made from my FREE patterns of LICENSED characters, not to be a jerk but because some of these license holders can stop the sale of these items and force me to take down my patterns, even though they are free.

Trademarked Characters
This is a whole other beast of a question! I do not have a firm grasp of trademark law, but I know of too many knitters and pattern designers who have gotten themselves into legal trouble creating, designing, and/or selling trademarked or licensed characters. If you are a fellow knitter, I am sure you are familiar with the saga mazzmatazz went through when she designed and shared some free patterns for Doctor Who characters. The BBC found unlicensed knit characters being sold on ebay and went after the designer, hitting her with a cease and desist. This article sums it up nicely. Mazzmatazz was lucky and over the course of a few years was able to work with BBC to release some new and officially sanctioned Doctor Who patterns (more info on her site).

There are also multiple cases of designers, crafters, and sellers of "Jayne Cobb hats" getting hit with cease and desist letters. This article explores the situation really well, but basically the characters and their appearances are intellectual property trademarked by Fox. Distribution of patterns (even if free), and sale of hand knit hats were cutting into Fox's profits of their own licensed products, much in the same way BBC lost some sales of character figurines to the unsanctioned plush ones.

You can see how this gets messy. Some companies don't care, or don't police so only care when it is brought to their attention, and others are very diligent and strict. I don't mind sharing my patterns, but they are free for this reason, and should I ever be asked to take them down by the intellectual property trademark owner, then I will comply most willingly. That being said, I know I have shared intentions of certain themed products for my shop. I have less qualms charging for items I have designed myself (key phrase here), and that I have put hours and materials into. At that point, I feel I am charging for my time and out of pocket costs, but again should I be asked to stop doing so I will.


I hope that may have answered any questions you have about copyright when it comes to  requesting knit items, selling knit items, and designing knit items. I have linked you to my research, and while my basic understanding is that for non-trademarked creations copyright law only protects the written pattern and not and items you make using it, please feel free to peruse my sources and conduct your own research. If you find any errors or are better versed in copyright and trademark law than me, please leave a comment. If you have further questions, also leave them in a comment and perhaps I or one of my readers can answer it for you n_n

Wednesday, June 11, 2014

Laundering Hand Knits

About a year ago, I made a post titled "Caring for Hand Knits" which went over the basics of how to wash, dry, and store your hand knit items. I collected this information from a variety of sources and personal experience. At multiple points, I mentioned information that you would find on your yarn label (if you are a crafter yourself), and/or that I would pass along to you (if you are a customer).

I thought now would be a good time to review my yarn care post, and revisit the issue by sharing with you the information you would find on your yarn label (or on your Handmade by Caitlin label). This image comes from Lion Brand Yarns and summarizes their universal care labels, however you will likely find these are very similar symbols on other yarn brand labels and even clothing tags.


Should you purchase an item from me, I am currently in the practice out writing out these instructions for all non-acrylic fibers instead of putting symbols on your labels. However, this is useful information to have, and as the shop continues to pick up speed procedures may change over time to make things more efficient on the production end.

Do keep in mind, these are general guidelines about what should be OK to do when laundering your items. I also recommend against bleaching and ironing all hand knits and exercising extra care and caution (e.g. always use gentle cycle, no hot water, do not dry on high) when laundering as even sturdy yarn still makes for a more delicate item than one bought at a store.

Monday, April 7, 2014

New Products!

Ok--so I'm a little late on the updates. I am sure most of you have already seen them on my Facebook page, but let's get the bog moving again with some new release highlights and some talk about what is to come.

Last week I released a new toy set and outfit, as well as updated an existing toy set. Let's start with what is new n_n

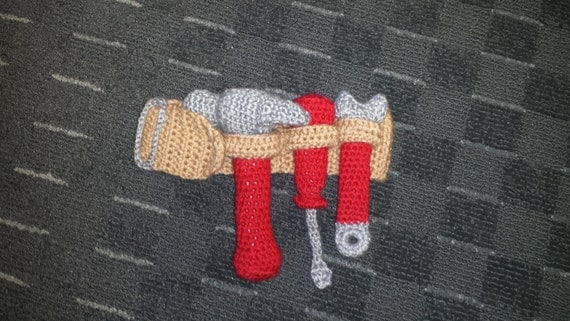
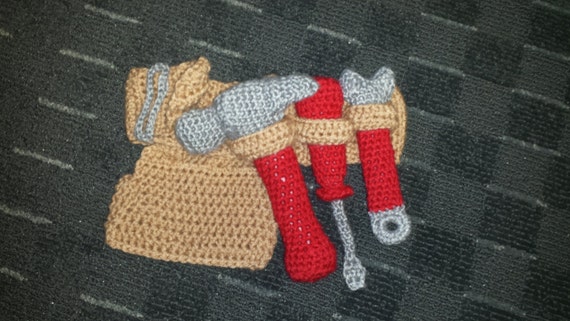
Tool Belt Toy Set
This little set is currently a favorite of mine. I designed it for a local ministry to use as a door prize, as after one of the members saw my purse set (she is also friends with the mama) I was asked to make one for them to raffle and a boy set of some sort. So here you have the tool belt:
Toolbelt Toy Set
The hammer, screwdriver, and wrench are plush but can be turned into rattles via an add-on listing in my shop (however, I feel the hammer would be best suiting for this as the wrench is very flat so the rattle piece would be noticeably felt, and the screwdriver does not have much room for a rattle piece, but it would fit in there without being as noticeable as the wrench). The listing includes the belt, and the pouch is available as an add-on for a small additional fee. Originally I wanted to include the pouch in the listing, but I was already looking at a higher price without it just due to the extra materials.
Toolbelt with Pouch
This listing does have some costumization as well (I love to give you guys options!). There are 6 colors for the tool handles (Red, Royal Blue, Dark Green, Yellow, Neon Orange, Black) and 3 colors for the belt/pouch (Tan, Brown, Gold). I do not list sizes, but the default belt length is 23.5 inches which will easily accommodate up to a 22 inch waist. This measurement is laid flat and the belt is rather stretchy so can accommodate a slightly larger waist, and it is adjustable so will definitely accommodate smaller waists. If you want it shorter or longer please just add a note on your purchase.

This was a huge hit locally and already has an order! Turn around time is 3-5 days for crafting, plus an additional day or 2 to get your item packed and shipped.

Construction Outfit
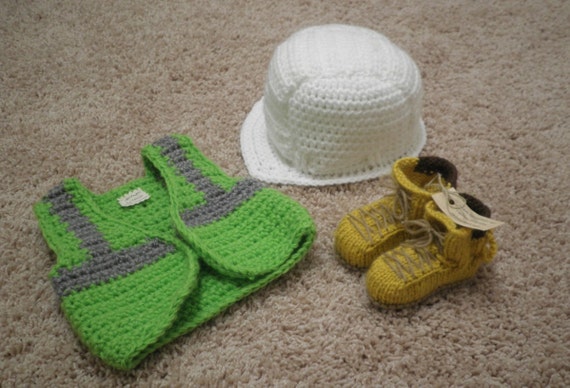
I know I mentioned this last year when the custom Nicor Reader Outfit was posted, but the construction outfit is finally available! I had to do a little research as designed the hat and had trouble scaling it to other sizes, and the free vest pattern I used was one size only. Now that I have found patterns that I can use for shop items, the outfit is ready for sale:
Construction Set
This set includes a hard hat, safety vest, and work boots. You will notice 4 sizes are listed, but only the work boots actually have 4 sizes, while the others have 3. The hat and vest patterns only had sizes 0-6 months, 6-12 months, and toddler while my booties size differently as I actually did scale that pattern after creating it. This just means you have some additional size options for the booties, and the corresponding hat/vest will be made as well. So, your size options are:
3-6 months (3-6m boots, 0-6m hat, 0-6 m vest)
6-9 months (6-9 boots, 6-12m hat, 6-12m vest)
9-12 months (9-12m boots, 6-12m hat, 6-12m vest)
12-18 months (12-18m boots, 12-18m hats, 12-18m vest)

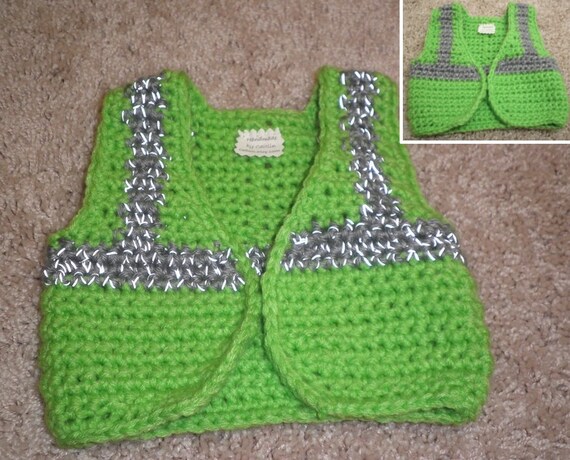
And again there are customization options. One day I hope to have the free time to make samples of all my listings in their available made-to-order options (and of course I always accept custom requests for different color options/combos!), but in the mean time there are swatches of the colors. The hat has 3 colors (White, Construction Yellow, Construction Orange), and the vest has 3 colors (Neon Yellow, Neon Orange, Neon Green). The boots are currently only available in standard work boot gold. There is also an optional add-on for reflective stripes on your safety vest. Do keep in mind the reflective thread is not very elastic though, so if you are on the cusp of 2 sizes order a size up.
Reflective Safety Vest
Turn around time for this order is 5-7 days. Adding reflective thread does not affect the crafting time.

Purse Toy Set
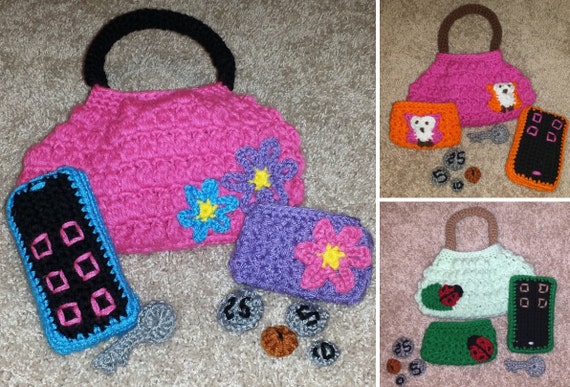
I will not go into great detail about this, as it has been covered previously. The purse toy set includes a purse, wallet, and stuffed cell phone (rattle option available). The inclusion of the key and coins have been made optional as they are rather small and could be a choking hazard if this gift is for an infant instead of a toddler. There are 3 specific designs available for sale, and a made-to-order listing which lets you choose your design and colors (colors are to be added in the notes to seller section of your order, as there are too many variables to list in a drop down; color swatches are provided in the listing).
Purse Toy Set
There are also a few listings coming up for adults. Currently one purse and wallet only set is listed for purchase as the purse is a good size for a clutch and the wallet holds cards perfectly. Eventually they will be listed as individual products as well...keep your eyes peeled!

Coming Soon
I have 3 friends expecting, 1 coworker expecting, 1 friend trying, and another friend with a little boy turning one! That means lots of planning, designing, etc. That also means possible future products for you!

The toolbelt has inspired me to make a Tool Box! The same tools will be included, but they will be housed in an old-fashioned tool box. I have some sketches down, but I have not quite figured out construction. I want this to be stable which may include support structures or extra yarn. Unfortunately this will affect price and the tool box is likely to be more expensive than the tool belt but I am hoping to keep it in the $30-35 price range n_n

I also am designing a Letterman Jacket as one of my gifts. It will be super cute and I can't wait to finish it. This will definitely be available in the shop, with either color combo or school color choices and multiple sizes. The one I am making for my friend will have his initial...I am not sure how to handle that in my listing (we are only allowed 2 variables in etsy), so they may be preset to the school, or I will ask you to request a letter in the Notes to Seller (this way you can do a school letter or initial).

I am also looking into Blankets and Caps for order. Sometimes it can be daunting to come up with a design on your own or make a custom request without an image to go with it. Since I will be making a good amount of blankets coming up, I am thinking of making a few listings of different stitch patterns with the colors and border style as your options. Likewise, a cap listing with color and size choices would be added. What do you think?

Ideas
My friends are awesome. Seriously. They also help me come up with cool ideas. Not too long ago a few suggested super hero chucks, using the hero logo in place of the star patch. So that is definitely something I am playing with, as well as how to translate the idea over to super hero mary janes. I am thinking either clay or painted buttons to go at the end of the straps, similar to how I've used small flowers on some pairs.

Building off the construction set, last week my buddy and I came up with a few ways to adapt it to multiple themes. He came up with the idea of a hunting set, consisting of a camo billed cap, neon orange vest, and the boots. He also suggested a biker set with a black helmet, vest (jean or black, possibly with patches), and black combat boots. Taking that a step father I was thinking cowboy/rancher set consisting of a cowboy hat, plaid/denim vest, and boots (either work boots or cowboy boots).

With the bridal mittens in the works, I am always thinking of more items for the teens and adults. Even though it is finally getting warm in the states, I am thinking of some fingerless gloves. They are always great year round, especially for office workers or people living farther north.

Do you have any ideas or requests? If so, post them here! Or on Facebook, or convo me on etsy n_n

Wednesday, November 6, 2013

General Sizing: Hats

As I've mentioned before, I list sizes by age and that can be somewhat arbitrary. I always try to give you the most accurate sizing information possible by also including the actual measurements. However, sometimes when I am given a custom request, the "size" asked for may not correspond to the measurements you and I are both thinking of. To help you figure out what size to be ordering, I put together this list*:

PREEMIES

1-2 lb (1 kg)7.5-8 in circumference
 3.5-4 in height
18-20 cm circumference
10 cm height
2-3 lb (1.4 kg)8.5-10 in circumference
4 in height
22-25 cm circumference
10 cm height
4-5 lb (2 kg)9-11.5 in circumference
4-4.5 in height
23-28 cm circumference
10-11 cm height
5.5-6 lb (2.7 kg)11-12 in circumference
5-5.5 in height
28-30 cm circumference
3-15 cm height

BABIES

Newborn (0-3 months)11.5-13 in circumference
5.5-6 in height
29-33 cm circumference
13-15 cm height
3-6 months12-15 in circumference
6.5-7 in height
30-38 cm circumference
15-18 cm height
6-12 months14-17 in circumference
7.5 in height
36-43 cm circumference
18 cm height
Toddler (1-3 years)16-18 in circumference
8 in height
41-46 cm circumference
20 cm height

KIDS

Toddler (1-3 years)16-18 in circumference
8 in height
41-46 cm circumference
20 cm height
3-10 years17-18.5 in circumference
8.5 in height
43-47 cm circumference
22 cm height
Pre-teens18.5-20 in circumference
9-10 in height
47-60 cm circumference
23-25 cm height

ADULTS

Teens18.5-20 in circumference
9-10 in height
47-60 cm circumference
23-25 cm height
Women19.5-20.5 in circumference
11 in height
50-52 cm circumference
28 cm height
Men21-22 in circumference
11-11.5 in height
53-56 cm circumference
28-30 cm height

This is an approximation, but I try to follow this list as best I can when posting items.You will notice some ranges overlap; this is because head sizes vary, but my listings will usually have a concrete measurement listed. If there is a range in the listing, the fist number is from the piece being laid flat and the second is with some stretch to give you an idea of what size head it can comfortably fit (typically hats can stretch comfortably 2 inches beyond circumference).

I'll give you a quick break-down of how I measure head wear:
  • Circumference is determined by laying the hat out flat, measuring across the widest part, and doubling the result.
  • Height is determined by laying the hat out flat and measuring from the brim (does not include ruffles, earflaps, etc) to the highest point of crown.


*You can order by size or provide the actual measurements of your child's head. If you find measuring your child's head difficult (which is understandable, they can be quite squirmy) or are ordering for someone else's child, you can measure a hat that already fits or use my chart above to estimate what size you want.

Wednesday, October 30, 2013

How do you price hand made items?

This is a common problem for any one trying to get into selling their hand made items. How do you determine a price? What is fair? How do you compete with others making similar things?

You don't really want to charge for your time, because prices could skyrocket. I could get away doing this for some items, if I charge $5/hr and no more. For example, I can do a pair of simple booties in 3-4 hours, so that would be $15 or $20...I charge that for some booties, but the very basic ones I charge less. Would you be willing to pay that much for a solid color pair of booties? Maybe, but only because they are hand made. And if I up my rate to say $7 or even $10 an hour (which is still low-balling the worth of my work by just barely hitting what baby sitters make, and is a good deal less than what I make at my day job being a receptionist/admin), then the prices are getting to $21-$28 or $30-$40 per pair of booties. Now would you be willing to pay that for a simple pair of booties? Probably not. And I reiterate this is a simple pair. The roller skates, for example, take considerably longer as I am making and attaching 8 wheels. If I charged by time, the cost would almost double. Even going back to charging $5/hr, that is $30-$40 per pair of roller skate booties. Seems a bit outlandish, doesn't it? An afghan, which takes me about a week (let's say 15 hours), would cost $75. Maybe for a full/adult sized afghan would you be willing to pay that, but probably not for a baby sized afghan...

So...realizing hourly wage is in no way fair to me or you, I've done a fair bit of research online trying to figure out how to fairly price my products. The simplest and least concrete method is to look at similar items on etsy (or other shops like artfire, etc) and see what other people are charging, then determine where in this range your product falls with you feeling like you can actually make a decent profit. I did this at first when I opened my shop as Caiti Scarlet Designs and carried jewelry. This worked for me, and I found prices that I felt were competitive without cheapening my product, and I was happy with the return. However, if you shop around, have a lot of business, the right connections, or other crafty friends, you can buy in bulk and save a lot there as well so this method isn't likely to hurt you. Not so much with yarn...

I've come across 2 reasonable ways that other yarn crafters have used. Method 1 involves measuring your yardage and charging by the yard. The amount I saw was $0.05 per yard. This is rather fair, although does not fully compensate any embroidery, stuffing, eyes, beads, or other embellishments. But as far as a base goes, I find it fairly reasonable. Also, this was a year or so ago, so the recommended rate per yard may have even jumped. The only problem, other than lack of compensation for other materials, is that you need a way to determine your yardage. This can be done by weighing your yarn (in whatever way makes sense to you...such as the skein before and after, or the finished project, etc). Just use the provided info on your yarn label and do a quick equation of total weight multiplied by yarn over grams. There are also nifty little yardage counters you can use while knitting up your item.

Now I find the need to weigh my yarn or run my yarn through a a counter a bit finicky and annoying. Also, I don't like the fact that it doesn't provide an easy way to accommodate for your other materials. Because of this I use Method 2, which is basically charging 3 times your total material costs for the product. This also provides a fair and reasonable price, and it is a bit easier to figure out than the previous method.

I usually stick to this method...it is simple to follow and gives me pretty even pricing across products. However, when selling online there are fees to consider. If you do not want your fees to cut into your profit, consider adding 10% to the price. That isn't an arbitrary number, and I'll show you how I came up with it, but for those of you looking for the quick answer, there it is.

The Basic Process:
Base Price: 3 x materials cost
Etsy Listing Fee: $0.20
Etsy Selling Fee: 3.5% Base Price
Paypal Fee: 5% Base and Shipping


OR 110% x (3x materials cost)


          An Example: a typical infant afghan (priced at $35)
Materials: 3 skeins yarn @ $3.99 each (excludes tax)
Materials Cost: 3 x $3.99=$11.97

Base Price: 3 x $11.97=$35.91
Etsy Listing Fee: $0.20
Etsy Selling Fee: 3.5% x $35.91=$1.26
Paypal Fee: 5% x ($35.91 + $10.95*)=$2.34

Total Price: $35.91+$0.20+$1.26+$2.34=$39.71

$39.71÷$35.91=1.106 or 110%

*assuming priority mail medium flat rate box

Wednesday, October 16, 2013

Handmade for Adults

I thought now would be a good time to take advantage of Shop Info Wednesday to remind you that while most of my stock and products are for infants, I can and will venture beyond that scope. I can make items for older kids, adults, household use, and even decoration. In fact, this is my usually fare for non-shop projects (just ask my friends and family...they receive a lot of them!).

Would you like some examples*? OK!

One of the gifts I give that get rave reviews are actually wash cloths...seriously. They are knit from cotton and have a decent texture for scrubbing if necessary. My mom asks for more all the time! I've started expanding them in to kitchen and bath sets as well

I also make clothing and accessories that will fit anyone from baby to adult, although there are some caveats to that. As I have designed very few items myself (especially clothing-wise), I am limited to patterns where the designer has given express permission to sell items made using that pattern. Unfortunately this means you cannot just link me to a pattern and request I make it for you and get paid...I want to respect the designer's rights. As such, some projects you may see on my flickr, blog, or Ravelry may not be reproduceable for purchase. However, I am willing to help you find a pattern that I can sell items from and work with you from there.
In fact, there are some items that can be easily designed without infringing on designer rights. For example: socks, mittens/gloves, hats, and scarves. There are many basic patterns or formulas and a variety of free stitch patterns (e.g. cables, checked, lace) that can be fairly easily implemented into these items. I am actually working on a project right now involving 6 pairs of mittens in the same 3 colors but with varying stitch patterns (more on this next week!)


*If you want further examples, check out my flickr...I am slowly updating it to have all my Ravelry projects and shop products in there.

Wednesday, July 17, 2013

How Long Will my Custom Order Take?

While I will always give you an estimate upon placing your order, I realize for some of you it may be easier to have a general idea instead of spending a few days messaging back and forth while you try to determine what items you want and whether they can be completed within your time frame. So this post is a general guideline for how long individual items may take. I will give you what information I can to help you see how that time changes in a gift set too, but please always feel free to reach out to me if you have questions about crafting time before finalizing your order.

Footwear

Barefoot Sandals are a very quick project for me. Turn around time is 1 day as long as I have the colors on hand. However, this does not mean you should expect 1 day per pair if you are ordering more than one. I can easily get through 3 pairs a day, and I have been able to pull off 6 in a day before (although I will admit I worked on them pretty much all day).

Booties have a slightly more varying turn around, but I will try to get as specific as possible...

Plain cuffed booties usually take about 1 day. If you want an image on them, the time ups to 2 days. Your typical time quote will be 1-2 days regardless of style just to give myself a buffer.

Mary Janes and simple sneakers take 1-2 days. Usually I can pull off 1 pair in a day, but it will take all day for me if Monday-Friday, and if I have other projects I like to give myself that 1 day buffer. If you want flowers or other adornments on the Mary Janes or for the sneakers to be Converse (or another logo) then it definitely takes the full 2 days, and if in conjunction with other orders (which I will inform you of, and you can always check on my current orders) it may possibly take 3 until I can ship.

Ice Skates and Cleats take about 2 days. If you add on logos or a lot of color changes, there is a possibility of the time upping to 3 days. Basically simple ice skates and cleats take 2 days, complicated designs average 3 days.

Roller skates take the longest. I have to make 8 wheels, and while they are tiny they take a bit of time. For roller skates I always give myself at least 3 days, sometimes I need 4 if I have other projects going on or my day job has gotten particularly crazy. Normally I will give you an estimate of 3-5 days just to cover myself, but always mention your time frame to me as I will do my very best to accommodate your needs.

Headwear

Headbands can be done within a day as long as I have the bases on hand (which I usually do). At most you will wait 2 days until shipping so that I can acquire materials.

Hats, like booties, vary by style...

Simple beanies take about 1 day. If they are relatively plain, I can usually get two of them done in one day. If you want an image on the hat, it ranges from 1-2 days depending on complexity. If you ordered more than 1 adorned beanie, I would quote you at 1 day per hat.

Specialty hats honestly range in time by design. I did a toddler hat that had a interchangeable cubs logo/flower to attach which took about 3 days. The flower bonnets typically only take 1 day, sometimes 2 in order to get to the flower due to my schedule being busy. The derby helmet took 2 days, but day 2 was mostly figuring out the logo and making it look correct. I guess to give you an estimate, I would say specialty infant hats will be estimated at 1-3 days.

Clothing

Clothing gets a little less precise. I can give you an estimate by project, but to just list general guidelines is a bit tricky. Some clothing is lacey or made with thicker yarn so it goes faster. Other clothing is very solid, or long, or complicated, or uses thin yarn so it will take longer. I can give you some projects I have worked on in the past and how long they took to try and help though:

Dresses
A lacey newborn dress took me 1 day. A solid tunic length 12 month dress took me 1 week. A solid knee length 5T dress took me 2 weeks.

Tops
I made a caped sleeve cardigan for a newborn and it only took 1 day. I would say this is a pretty fair estimate for short sleeves, and I would probably quote you at 2 days for long sleeves.

Bottoms
I honestly have sewn all my skirts so far and have yet to do pants. I have done a pair of overalls, but it was a personal project not an order and as such kept getting put on the back burner.  I believe it took me about a day for each leg...Given that I would quote you at 1 day for diaper covers, shorts and short skirts. I would quote 2 days for longer skirts and pants (up to 12 months, beyond that we may be looking at an additional day). For overalls or a jumper I would quote 2-3 days.

Cocoons
Are cocoons outfits or blankets? I never know how to categorize them... I think I have been lumping them in with clothes so far, so let's stick with that. The cocoon and matching hat set I made took 1 week.

Blankets

Receiving blankets will take minimal time. I would say approximately 3-5 days, mostly dependent on fabric acquisition. These are fairly simple and rather small blankets with minimal sewing and a crocheted border. If the fabric desired was on hand or easily attainable at a local store, it will only be 3 days.

A typical knit/crochet blanket takes about 2 weeks. Sometimes I can rush these and complete them in 1 week, especially if they are of a smaller/newborn size or simple design.

The regular tunisian blanket took me about 6-8 weeks to complete. These blankets unfortunately cannot be rushed too much. They are just simply a lot of work, as each row is worked twice. They are also worked with a finer yarn which means many more stitches.

However if you like the tunisian look but want the blanket faster, there is the large stitch tunisian blanket option. These blankets are made with a thicker yarn. They are a little more airy and less dense than the regular tunisian blanket, but they are still about as thick. However they can be worked up in about 4 weeks. Check out the post I made comparing the two a couple months ago to get a better idea what these differences mean.

Toys

Toys vary with complexity...

Generally speaking, small toys and rattles can be done in 1 day. I may quote you 2, and that is only to give myself time to acquire the rattle insert or sew the toy together if it is made in multiple pieces (which for infants I avoid as much as possible).

Medium toys generally take 2-3 days.

Large toys vary again, but unless they are overly complicated I would quote you at 5-7 days. If the toy is for an older child or adult, I can get more detailed and am more willing to make them in multiple parts. Toys of this nature could take 1-2 weeks depending on the complexity.

Notes

Non-Listed Colors
Normally I will include time to acquire materials in your original time quote. But to give you an idea, if the colors you request are listed in my available colors, then I have it on hand or can buy it/more of it at a local store. If you want another color, I am always happy to accommodate, but I will need to go out and purchase it. If I can find the colors you desire in a local store, it will only add about 1 day to your time. However, if I need to order the color online, as unfortunately happens with some colorways (I don't know why...but sometimes 1 store will carry a color on site, another online only, and another not at all!), your time will increase depending on how long shipping is. I can expedite shipping for supplies if necessary to meet your needs, but I may up your price just a tad to cover these expenses.

Tight Time Frames
If you find yourself in need of a product within a tight time frame, please let me know. The times I provide are the longest I expect something to take and usually have buffer time built in for random things like my day job becoming busy, a sick day, or overlapping projects. Some clients give me a lot of advance warning on their needs, so some of these projects can easily be set aside for rush orders. I can also adjust my schedule to make room for more crafting time.

Shipping Upgrades
If the time frame is very tight, I may ask you to pay extra for expedited shipping. However, if I guarantee your timeline and find myself falling behind, I will pay for the shipping upgrade to ensure you receive it on time.

Thursday, July 11, 2013

Yarn Options

I briefly went over fiber options in my Caring for Hand Knits post back in May, but that didn't really get into why you might choose a specific fiber. Unless of course your only concern is ease of washing n_~

Anyway, yarn options can go one of two ways: fiber or weight. Fiber is pretty self-explanatory. For the most part you have 3 options: synthetic, natural (animal), and natural (plant). Weight refers to the yarn thickness. There are a wider range of options for weight, but typically infant projects range from fine to medium. Weight is also usually dictated by the project, but in some instances (e.g. blankets, sweaters) you may want to choose.

Now for the break down...

Fiber Types

Natural Fibers: Animal

Wool varieties come from sheep. Depending on the type of wool, the yarn will range from scratchy to very soft (although with a good wash, most ends up very soft). Wool also has the possibility of allergies (specifically lanolin which keeps the wool soft, but the fiber itself can cause reactions too)--this is something to be careful with when ordering infant items. However, wool can also be very warm so may be a good choice for a blanket or sweater in colder climates. Most wool also needs to be hand washed and requires special care. There is also the possibility you will see some dye in the water during your first few washes. This is normal with wool, and I always wash it at least once before sending your items out as well.

Superwash wool has been chemically treated so that it can be machine washed without felting. This essentially removes the outer "fuzzy layer" so the wool may not feel as soft or bouncy. However, it also tends to be more colorfast than regular wool.

Llama & Alpaca Fleece are naturally very soft. They are probably my favorite fibers. They are also said to be hypoallergenic, although I have run into a few people who are allergic so keep that in mind if you do not know about the baby's allergies. Like wool, llama and alpaca fleece will felt in a washer so items made with this fiber need to be hand washed.

There are also other kinds of fleece that you could select, but to be honest I have not worked with most of them:
  • Yak Fleece comes from yaks. Surprising, right? I have actually handled this and it was very sturdy. After 1 or 2 washes is softens up too.
  • Mohair & Kashmir Fleece comes from goats. I have heard they are very soft and cuddly fabrics. Mohair also has a halo about it.
  • Angora comes from rabbits. This yarn also tends to have a halo. I have also heard mixed reviews from it being very soft to very scratchy.

Silk is very soft and has a beautiful drape. However it is also rather pricey. This is a great choice for adult items like shawls, gloves, or stockings.

Natural Fibers: Plant

Cotton and Linen can be very soft or very sturdy. It honestly depends on how it was processed. For infant items I always use the softer cotton, but for kitchen items I tend to go with the sturdier cotton to give some extra oomph to your scrubbing power. You of course are more than welcome to request the soft cotton for kitchen items, and I usually choose it for bath items. Cotton is a great choice for knitwear in warmer climates. It is light and breathes very well. You can also generally wash cotton items in a machine (just be wary of hot wash and hot dry!)

Hemp is a very sturdy yarn. It is softer than the hemp twine or jute you would use for necklaces and macrame, but it is still a bit rougher than other yarns. Not to say this doesn't make for a nice fabric, but I recommend using hemp for small or lacey items over full solid garments (e.g booties or a shawl would be better than a solid knit sweater).

Bamboo is incredibly soft, but it is also a bit more processed than other plant fibers. It also has an incredible sheen and is said to be antibacterial. However it soaks up water quite a bit and can get weak when wet. This would be a great blanket choice, but perhaps not for every day items.

Rayon is another processed plant fiber. It also has a great luster and drape like bamboo. However rayon is weak in the heat, so needs special care and must be hand washed in cool water.

Synthetic

Acrylic is my go to for infant items because it is durable and can be abused (by children and washing machines). You don't have to worry about dye coming out in the wash or shrinkage. This is synthetic and unfortunately that means it is heavily processed. You may hear "horror stories" about squeaky or melting acrylic. I have never had this issue, although cheap acrylic is scratchy. However, I hate that kind so you will not be getting it in your orders.

Specialty yarns are a wide variety and include things like Ribbon, Art, etc. These yarns typically serve a specific purpose. Ribbon yarn is usually used for interesting scarves. Art yarn tends to have beads, varying thicknesses, or other adornments giving your item a unique look.

Yarn Weights

Lace yarn is very thin, almost like thread. This yarn is used to create a light. airy fabric. As such I would not recommend it for infant items. However, it is lovely for shawls or lacey cardigans (that you plan to wear over something else, of course).

Superfine yarn is still very thin, but it actually has some substance to it (unlike lace yarn). Other terms used to describe this weight of yarn include Sock, Fingering, and Baby. As you might guess, superfine yarns are often used for socks and other small items. I will use superfine for items like booties, sweaters, pants, and skirts. It will make a rather thin fabric.

Fine yarn is a more average weight. It is probably the thickness you would normally think of for yarn. Like superfine, Baby may also be used to refer to fine weight, as will the term Sport. This is the weight I most frequently used for infant apparel. It will not create a bulky fabric for small items, but it still has enough substance to it that I feel it will keep an infant warm in cooler climates. I occasionally will use this weight for infant blankets as well (particularly tunisian blankets--the thin yarn gives a nice tight stitch without making the fabric overly dense and stiff).

Light yarn is similar to fine but tends to have a bit more substance and bounce to it. You may also hear the terms DK (double knitting) and Light Worsted in relation to this weight. I tend to use fine and light rather interchangeably and sometimes mix them within one project.

Medium yarn is of an average thickness, and another one of the weights you probably naturally think about when yarn comes to mind. Worsted, Afghan, and Aran are other common terms that refer to this yarn weight. Normally I do not use medium yarns on baby items, except for blankets. I find non-tunisian blankets work well in medium yarns. I also use this weight for slippers and adult sweaters.

Bulky yarn is very thick. To give you an idea, the other terms associated with bulky are Chunky and Rug. You may hear the term Craft from time to time to.This yarn is a great choice for a thick blanket, sweater, or jacket. I would recommend considering this weight for blankets and outerwear in cold climates.

Super Bulky is getting close to thin rope in terms of thickness. Roving is also considered super bulky (for those of you not into fiber crafting, this is essentially taking raw wool or fleece and pulling it into strips). I rarely use this for clothing. On a rare occasion I may use it for a jacket or blanket.


References:

Wednesday, June 26, 2013

General Sizing: Infant Blankets

Every now and then I get asked what an appropriate size for a blanket is. There is no straight forward answer, as it really depends on what you want it for: How big is the baby/toddler? Do you want this to last as the child grows? What size bed is it for? Do you want to fulfill a specific purpose (e.g. nursing, hooded bath towel, stroller, car seat)?

Below is a list I have put together breaking down your various options and providing appropriate measurements for each. This is only a reference based off my research, but it may help you in choosing a size. Do keep in mind, however, that as the size increases so does the wait time and price.


General Afghan Sizing for Infants & Children
Newborn-2 years      24x30 inches 60.96x76.20 centimeters
2 years-6 years 30x36 inches 76.20x91.44 centimeters
6 years-11 years 36x42 inches 91.44x106.l68 centimeters
12 years + 48x60 inches 121.92x152.40 centimeters
Lapghan 36x48 inches 91.44x121.92 centimeters


Blanket Sizing by Baby Age
Preemie (small) 18x18-20x20 inches 45.72x45.72-50.80x50.80 centimeters
Preemie (medium)      20x20-22x22 inches 50.80x50.80-55.88x55.88 centimeters
Preemie (large) 22x22-30x30 inches 55.88x55.88-76.20x76.20 centimeters
Newborn 32x32-36x36 inches 81.28x81.28-91.44x91.44 centimeters
Baby 30x36 inches 76.20x91.44 centimeters
Child 42x48 inches 106.68x121.92 centimeters


Blanket Sizing by Bed Type
Cradle (small) 15x30 inches 38.10x76.20 centimeters
Cradle (large) 18x33 inches 45.72x83.82 centimeters
Crib (small) 28x36 inches 71.12x91.44 centimeters
Crib (medium)      30x40 inches 76.20x101.60 centimeters
Crib (large) 32x48 inches 81.28x121.92 centimeters
Port-a-crib 29x32 inches
30x36 inches
36x36 inches
73.66x81.28 centimeters
76.20x91.44 centimeters
91.44x91.44 centimeters


Blanket Sizing for Home Use
Receiving (newborn) 23x23 inches  
24x24 inches
58.42x58.42 centimeters
60.96x60.96 centimeters
Receiving (commercial)      29x32 inches
30x36 inches
36x36 inches
73.66x81.28 centimeters
76.20x91.44 centimeters
91.44x91.44 centimeters
Nursing (small) 24x36 inches 60.96x91.44 centimeters
Nursing (large) 28x40 inches 71.12x101.60 centimeters
Hooded (corner) 28x28 inches 71.12x71.12 centimeters
Hooded (center) 36x22 inches 91.44x55.88 centimeters


Blanket Sizing for Travel
Carseat* (baby) 20x24 inches 50.80x60.96 centimeters
Carseat* (toddler)      22x30inches 55.88x76.20 centimeters
Stroller30x40 inches 76.20x101.60 centimeters
*Carseat blankets come equipped with two 2.5 inch slits approximately 3 inches apart for you to thread the buckle through. Baby sizes have the slits starting 12 inches from the bottom of the blanket, and toddler sizes 15 inches.

Wednesday, June 19, 2013

Roller Skate Booties

I thought I would take this opportunity to discuss the roller skate booties I offer in my shop, specifically what makes them unique and why you want to buy them. You can go to etsy or any other crafty shopping site and type in "roller skate booties" and get a ton of results. Maybe too many. And they all look the same. So, what makes mine different?

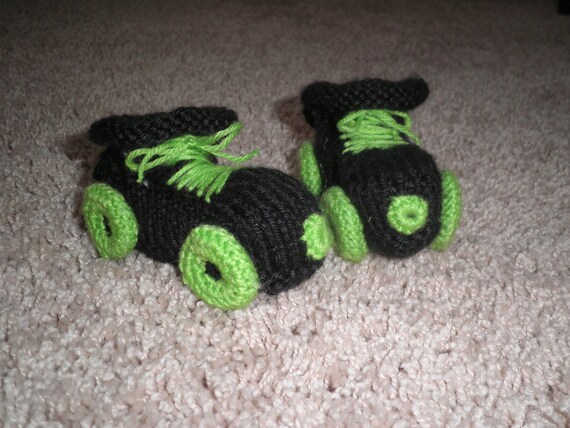
Roller Derby Booties

Knitting
My booties are knit while all other roller skate booties I have found are crochet. I find knitting gives me a more pliable fabric, making the booties more like socks than shoes. I find this advantageous for a few reasons: more stretch makes the booties easier to get on, more stretch also gives you some room for growth, pliability gives baby wiggle room, the thinner fabric makes cinching with ties easier and less bulky, the thinner fabric works well in warmer climates.

However, I am more than willing to accommodate your request. If you desire a sturdier bootie or thicker fabric, let me know and I can use a thicker yarn or crochet them instead of knitting n_n

Wheel Placement
You will notice most roller skate booties have the wheels attached to the bottom. While this is more accurate visually, it does make walking tricky, especially if your little one is just learning. My wheels are placed on the sides with the "axis" set at the bottom of the bootie where I start knitting the sole.

I took a bit of time researching before I came to this decision. As the original idea was to make derby skates, I looked them up and found that the wheels were set wider than on traditional skates, and in some cases this allowed them to come up a little above the the bottom of the skate boot. While my placement isn't completely accurate, it was close enough to allow for walkability.

My wheels are lightly stuffed to give them a full appearance, but they are quite pliable and will bend out of the way as your little one walks. Because of this, you can order roller skate booties (or slippers) for any age. This even includes older kids and adults! (although prices will have to change once we get past toddlers >.<)

Stoppers
I haven't seen other roller skate booties with stoppers (so far, anyway). Due to my booties having a slightly more sneaker appearance (although, this is rather accurate with derby skates), I wanted to enforce the image with stoppers. These are only slightly raised, in order to prevent extra weight or obstruction for learning walkers, and placed where the sole starts at the toes.

Customizability
Is that even a word? Because spell check is telling me no...we're going to go with it anyway ~_n

I love to work with you and make the perfect item you will love. I have made booties in 2 local derby teams colors, as well as other requests based solely on color preference. If you have a team you want skates for, let me know! We can go simple where I use the team colors for the boot and accents, or we can go advanced where I add a logo or duplicate official team skates.

Don't support a team, but still want something unique? That's fine too! Just let me know what you are looking for. I typically do a white or black boot and offer 1 accent color for wheels, stopper, and laces (and soon, now that I have discovered etsy's listing options, I will be putting up a customizable roller skate booties listing), but don't let that limit you. Want blue skates? How about each wheel in a different color? Or maybe you need the boot to look like a frog? Just let me know and I will work it out.


Have more questions about the roller skate booties? Post or send them and I will reply to you as well as update the information in this post n_n

Wednesday, June 12, 2013

General Sizing: Infant Footwear

I realize that providing sizes like 0-3 months and 6-9 months can be rather arbitrary. Babies don't always fit into their "size" as dictated by their age. I do try to give you the most accurate sizing information possible, including the measurements as well as the expected age range they encompass. For example:


However, there have been occasions where I've gotten a request for a certain size and got feedback that a larger size was in fact needed. I am more than happy to accommodate these requests, but to help you figure out what size to be ordering, I put together this list*:

0-3 months3.25-3.75 inches8.26-9.53 centimeters
3-6 months3.50-4.00 inches8.89-10.16 centimeters
6-9 months4.00-4.50 inches10.16-11.43 centimeters
9-12 months4.25-4.75 inches10.80-12.07 centimeters
12-18 months4.50-5.00 inches11.43-12.70 centimeters
18-24 months5.00-5.50 inches12.70-13.97 centimeters

This is an approximation, but I try to follow this list as best I can when posting items. You will notice the ranges overlap. Usually the first number is what the piece measures flat, and the second is slightly stretched. Otherwise, the piece is falling within that range when flat and slightly stretched.

On occasion I may just post one size instead of a range (e.g 18 months). This is usually when the yarn I use is less elastic, so the item will not stretch significantly enough to get a range.

I'll give you a quick break-down of how I measure footwear:

  • Booties are laid flat and measured toe to heel and sized according to my list above. The ankle circumference is measured with the cuff slightly stretched out (especially if the cuff is ribbed).
  • Barefoot sandals are laid flat with the ankle strap slightly stretched and are measured from toe loop to strap and sized according to my list above. The ankle circumference is measured by doubling the width across the top of the sandal.


*You can order by size or provide the actual measurements of your child's feet. If you find measuring your child's feet difficult (which is understandable, they can be quite squirmy) or are ordering for someone else's child, you can measure a sock or bootie that already fits or use my chart above to estimate what size you want.

Wednesday, June 5, 2013

Why Barefoot Sandals?

It's a fair question. Why do you want to decorate the top of your foot, but leave the bottom of you foot uncovered? This seems like the exact opposite idea off what shoes are supposed to be. However, there are times when barefoot sandals do make sense:

1. Dressing up on the beach
Do you ever want to look nice (or cute, fancy, etc) while on the beach? Shoes can be a hassle in the sand, even flip-flops. They drag, your feet still get dirty, and now you are tracking sand everywhere. Barefoot sandals allow your feet to look cute while still making it easier for you to walk in the sand.

2. Little ones that won't keep anything on their feet
Have a little one that just keeps pulling off her shoes, socks, and whatever else you try to put on her feet? It can be so frustrating, especially when you just want her to look cute for 30 seconds while you snap this picture. Barefoot sandals loop or tie around the ankle and loop over the toe, making removal by your little one difficult.

Barefoot sandals also leave the bottom of your little one's foot uncovered, which for some stops that frustrating behavior of pulling everything off. Toes are also free this way, and we know little ones just love to play with their feet and toes.

3. Engaging and stimulating your little one
One of the first feedback pictures I received of my barefoot sandals were of the customer's daughter using them as toys. She had ordered the Pink Bow pair, and her little one loved to reach for and pull at the bows on her sandals. Playing with barefoot sandals also helps expose your little one to new textures. High contrast combinations will also help stimulate (you can order in any color combination you want).

Playing with her feet also stimulates baby to pick her head up, and learn to roll up.

4. They are just plain cute
Ok, this may not be the most compelling of reasons to get barefoot sandals for your little ones.They may not be practical in all situations, but they are darned adorable. Since I provide ready-made as well as custom orders, this also gives you the chance to have some unique footwear for your little one.


So...now the question is:
Why order from Handmade by Caitlin?

  • My barefoot sandals are crocheted, which means no ribbons to wrap around your baby's foot and leg, and no beads that could become choking hazards if the thread breaks.
  • By default I make all of my items out of acrylic yarn. This is a synthetic fiber that can easily be machine washed and dried, making care for your items simple. 
  • I also make my barefoot sandals with a loop for the ankle, making them stay in place better.
  • I will work with you to make a pair to match that special outfit or with a specific look you are looking for.
Because I work with you to create the specific item you want, I am always willing to make changes to my default process. Sandals can have ties instead of ankle loops if you prefer. I am also willing to use a different fiber. While I would not recommend wool, it is definitely an option, and cotton would be an understandable choice, particularly if you look in a very warm climate. And of course you are welcome to request any colors, or ask for a design you haven't seen in my shop yet (e.g. monkey face sandals, your favorite sports team, a rose instead of a daisy...).

Please let me know if you have any more questions about this item and I will happily update this post!

Friday, May 31, 2013

Caring for Hand Knits

While I make a point of saying all my items are made of acrylic yarn (at least by default), which allows you to be pretty rough with them, I thought I would take this opportunity to explain how to prolong the life of your hand knits and how to care for other fibers.

Washing
Most people will recommend hand washing an item, regardless if it is machine washable (the yarn label will indicate this, and I will pass that information along with any item I make). If hand washing, gently agitate your item, but do not wring or scrub as it will cause distortion and wear. Rinse your hand knits with cold water until the water is clean. (Some wool washes say you do not need to rinse. I usually opt to rinse anyway.)

If you do choose to machine wash an item, I would recommend using the gentle cycle with cold or warm water as well as putting your item in a garment bag to prevent snags and pilling.

You will want to use a gentle detergent, baby shampoo, or a wool wash on your items. My favorite wool wash is Eucalan (which does have an unscented version, for those of you with fragrance allergies) and I use it for all of my personal hand knits. If you have a lanolin allergy, do not use wool wash--choose your detergent according to your needs.

Items made with acrylic can be generally thrown into the washing machine on a regular cycle. Hot water will not cause acrylic items to shrink. However, for longevity, I would recommend following the machine washing suggestions above.

Items made in cotton (or other plant fibers) can be machine washed as well in cold or warm water. Again, follow the machine washing suggestions above. Hot water can be used for particularly dirty items, but keep this in mind when it comes time for drying.

Items made with wool (or other animal fibers such as alpaca) will full (or felt) when washed in hot water with high agitation, causing shrinkage. Woolen items are best hand washed in cold or lukewarm water with little to no agitation. Hot water may be used, and is sometimes necessary with particularly dirty items, but make sure to avoid agitation. Superwash wool is designed to be machine washable (gentle cycle), but I would recommend erring on the side of caution.

Drying
Always support your wet knit items from underneath, as they will stretch when being held from the top only.

Not all yarns can be dried in a machine (this is also indicated on the yarn label and passed on to you with your purchase). If you do use a machine, taking the item out while still slightly damp will help keep the shape*.

If you are air drying your item, gently squeeze out excess water after washing. You may also want to roll the item up in a towel to further remove excess water.

I would recommend against hanging any knit item. The weight of the wet fabric will cause the item to stretch, and sometimes the items will stay in this distorted shape never bouncing back to their original form.

Most knit items benefit from blocking, or being laid out to dry in the desired form (you can use either a dry towel or a drying rack). Knit garments particularly are apt to stretch out as they are worn, due to gravity. Larger items may only get one wear before needing to be blocked back in to shape*.

*Small and infant items are not as susceptible to losing their shape, so if you do choose to completely machine dry or hang dry, you are not likely to have these issues.

Acrylic items can be put into a dryer, but keep an eye on them for pilling. While this is a normal occurrence with knits, and some commercial clothing, you may want to avoid it if possible. Pills can be removed afterwards if necessary with a tools like a sweater shaver or velvet clothes brush.

Cotton items can be machine dried. Sometimes this will actually help restore the item to its original shape. If you needed to used hot water to clean a particularly dirty cotton item, be aware that using a machine dryer may cause shrinkage.

Wool items should not be put in a machine dryer. They do best with the air drying method described above followed by blocking. Superwash wool can be machine dried, but again I recommend watching your garment for shrinkage or erring on the side of caution and skipping the machines.

Storage
Knit garments lend themselves to folding better than hanging (gravity strikes again). I would recommend not folding the same way every time to avoid potential permanent creases. Rolling is another viable option for storing your hand knits.

Acrylic items need no special storage beyond what I recommend above for all hand knits. Acrylic yarn is very resilient and since it is synthetic, it does not maintain moisture as long as natural fibers nor does it attract pests.

Cotton items should not be put away until completely dry. Damp cotton has the potential to mold, and nobody wants their special items lost to mold. Because of this, you also want to make sure your cotton items can be set out to dry quickly after washing.

Wool items again need the most care. Wool items are susceptible to moths. To avoid moths eating your items, make sure you wash them before storing. Routinely clean the area you store woolen knits (i.e. dust dressers, vacuum closets). You may also opt to store your items an an airtight environment, but make sure the bag/box you use is completely dry first.

If your items do get infested with moths, laundering them is the best attack. In this instance, you may want to take your item in to a dry cleaner, as woolen items should not be washed in high temperatures. Other options involve freezing the item below 18°F for several days or putting it in the oven at 120°F for at least 30 minutes. Afterwards, you will want to hang your item in the sun and brush it out.

What about dry cleaning? Most knit items do not need dry cleaning. However, rayon yarns may benefit from dry cleaning as the fibers get weak when wet.

What about stains? As with any other clothing, stains set over time. Due to the nature of yarn, stains may be a little more difficult to get out over time. Try to catch stains as quickly as possible and wash the item as soon as possible to avoid permanent stains. Keeping the stain moist, or using travel stain removers (e.g. Tide sticks, Eucalan wipes) also help prevent setting.

Wednesday, May 29, 2013

A Little Info on Tunisian Blankets

I recently made a tunisian blanket for a customer. The blanket was ordered as part of a gift for a newborn living in Texas, however this kind of blanket tends to be heavier than a normal knit or crocheted blanket. Luckily it was a local order so we got together so I could provide her with a few swatches of varying thicknesses in order to make sure the little girl would not be overly warm this summer.

That being said, I thought I could provide a little more information about this style of blanket to my online customers. I did not want to clutter up my swatch gallery with this information, so I am making a separate post.

Tunisian style crochet (or afghan crochet) is a style of crochet that is often compared to a mixture of knitting and crochet, technically and visually. The process itself involves picking up a row of live stitches along a long hook, much as you would pick up stitches along a knitting needle, and then crocheting across these stitches one by one until the end of the row. This means that I am essentially working each row twice. Also, if you look at my swatches, you will notice what appear to be columns of Vs (which are characteristic of knitting)

The fabric created using tunisian crochet is considerably less elastic and substantially thicker than a typical knit or crocheted item. I do want to point out that while this means the fabric is dense, the blanket itself will not be stiff. This may affect your decision in a few ways:
  • The blanket will not stretch out much, so you may want to consider this when choosing your size (particularly if you want it to be used into the toddler years)
  • This means no little holes for fingers and toes to poke out, which is ideal for harsh winters
  • Dense fabric may not be ideal for warmer locales, particularly during summer
  • If you do want a tunisian blanket for someone in a warmer locale, consider the large stitch option
  • The extra thickness may be ideal for travel or changing tables, due to the cushioning
  • Due to the extra time and materials, these blankets will cost a bit more than a regular knit or crocheted blanket of the same size. These blankets also take about twice as long to make.
I do not want to discourage this type of order, but I do want you to understand what you are ordering as well as why it costs more and takes longer to make.

Now, I did mention the large stitch option, so let's get into that a little bit...

Typically I make tunisian blankets using a thin yarn and an average hook (for those of you that are fiber crafters, this means baby/fine weight and H/5mm hook). This creates a pretty sturdy fabric that holds up very well to travel and washing machines. I live in the Chicago area, and this blanket was perfect for our winters.

For the blanket that would be winging it's way to Texas, I played around with different options. I used a much larger hook, but to avoid making the blanket very lacey/holey I also had to use a thicker yarn (again for you fiber crafters, this means worsted weight and L/8mm hook). This created a fabric that was a little less dense. Due to the increase of yarn thickness, it was about as thick as the regular tunisian blanket, but the increase of hook size made it a little airier (the stitches were not as tight together, making the blanket less dense and also providing a slightly lacey texture and appearance allowing for more air flow through the blanket).


You can choose either option, depending on your needs. I would like to point out some key differences in terms of time and cost however:

The regular tunisian blanket took me about 6-8 weeks to complete, whereas the large stitch took about 4 weeks. A typical knit/crochet blanket takes about 2 weeks, sometimes I can rush these and complete them in 1 week (if they are of a smaller/newborn size). I can make accommodations on occasion and finish your item faster than quoted, but it all depends on my other orders, my day job, and my homework load.

Due to the fact that I am using almost twice the amount of materials, and working at least twice as long on a tunisian blanket, the costs are going to be a bit higher. Do not be surprised to see your blanket priced $15-20 higher than a non-tunisian blanket of the same size. If you order a gift set, I will offer a large stitch discount (usually $5-10, depending on the set).

I hope you have found this information helpful. If you have further questions please feel free to ask and I will update the information to reflect them.


I will not sticky this post, but I am going through and updating my tags for easy searching. You should be able to type in the item you want info on (e.g. blanket or tunisian blanket), or you can do a general search for product info. I will also try to find a simpler way to provide you this information in the future, as I begin making more posts about other products.

As always, feel free to contact me if you have any questions or requests. I regularly check my blog for comments, my etsy shop, facebook, and my email n_n